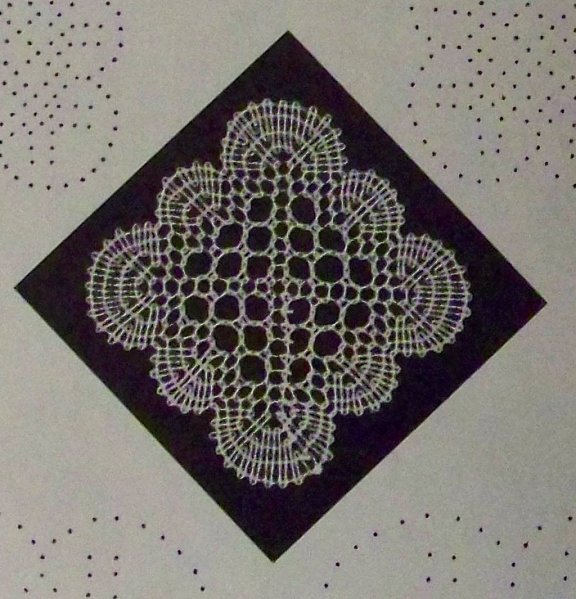
Thursday, March 1, 2012

Finished!

Even with the couple of mistakes, I can't believe I made this.  : )
I need to take it to the fabric store tomorrow to get the material for it.  It's so light and delicate-feeling.  But it's cotton and it's going to go into a display so I think it will hold up fine.

Hummmm....what next?  I think there may be a fan in my future.  I've gotten fascinated by lace fans and I've got an idea for a mixed lace fan.  Hopefully I can get that started this weekend.  It's going to have bobbin, tatting, knitted and crochet lace.  More on that later.

Friday, February 24, 2012

Almost there

Just a quick post before I go learn to play the mountain dulcimer.  I'm officially 3/4 around the edging:
I'm really pleased at how much I'm learning in this project and how it's coming out.  I called it a doily edging but was corrected that it was a hankie edging.  Never mind, for me it's a doily and, if I manage the connection reasonably well at the end, it's going to hang!

Now I'm off to learn how to play this gorgeous instrument properly.  This, in case you don't know, is a mountain dulcimer.  I've just been introduced to it because one of the folks involved with the Folk Art School is a dulcimer maker.  This isn't one of his but I love it.  I love the natural wood look and it has a beautiful tone.  

I can actually play a song and a half.  I can play Amazing Grace and the first half of Danny Boy!  So I'm not doing so bad - hahahaha.  See ya.

Sunday, February 19, 2012

Moving along

Since I got one bobbin lace project under my belt, I decided to dive into another.  This one is an edging with footside, torchon ground, rose ground and a fan on the headside.  Doesn't that sound like I know what I'm talking about?!  Ha!  Actually, I read it in the book that I got the pattern out of. 

It took me the whole week to get the first little section at the beginning up to the corner.  I had almost the whole section done when I realized I'm made several glaring mistakes that I couldn't live with.  Actually, I probably would have lived with them had I not realized that I would be going all the way around and once I got to the end, it would have been ruined from the beginning.  So I worked that section several times over until I learned how to do the pattern, then I took it out almost to the beginning and started again.  Took me a week to get through all that but by Friday night, I was at the corner, had figured out how to turn the corner (read the instructions) and then Saturday I was on my way.

If you click on the photo, you can get a better view of the part without pins. 

I've learned how to go from one section to the next, how to replace bobbins as I work, how to recognize when I've made a mistake soon enough that it doesn't make me cry because I have to take out inches of work and how to "rip out."

This is going to make an edging of about 8" square and I've been trying to decide how I want to display it.  Some options are to sew it to a linen center piece, sew it to a piece of knitted or crocheted center piece, sew it to a linen or other center piece and mount it in square frame, do the frame thing and include a pair of bobbins in the frame for a little tableau, do the frame and bobbin thing without the center piece and hang the bobbins in the middle of the lace or something else.  I think I really like the frame idea if I don't screw it up somewhere along the line.  I don't really have a place for doilies to be out and displayed and that way, I could enjoy it all the time.

First I need to get it finished.  As you can see, I'm a little over a quarter of the way done but I've done all this from Friday night to Sunday afternoon.  If I just don't try to rush it, I think it should be okay.  I have to say that I've really enjoyed the brain power it's taken to understand the pattern and how to work it.  It's been quite a challenge!

Sunday, February 12, 2012

When in doubt, read the instructions

After my good start on the bobin lace project, things went badly wrong and I ended up with a mess.  I obviously hadn't gotten the hang of making the main stitch of the project.  So, out came the book and the basic lesson on Scandanavian holes.  After going through the practice piece, I realized what I'd been doing wrong.  Now it was time to go back to the drawing board:

You can see at the top right the mangled piece.  To the left is the practice piece and the bottom right is the finished piece which was done properly.  This is the most complex piece I've completed that was actually done right so I'm feeling quite the sense of accomplishment.

Bobbin lace is quite as addictive as any patterned knitting.  It's that feeling of, I can't lay it down because I just need to see what it will look like through this section.  Just one more stitch.  It's the eternal cry of the addicted.

It's been quite a saving grace for me this week to have this puzzle in front of me, having to pay strict attention to every single stitch.  Other parts of life have been so frustrating and maddening that having to pay such deep attention to something has saved me from playing the craziness over and over in my head. 

Not bad, getting therapy and achievement, all in one go! 

Excuse me while I go rewind my bobbins and prick the next pattern.

Tuesday, February 7, 2012

50 Steps Back

I got the hankering to try a new bobbin lace project.  I've actually got a multi-craft project in mind and wanted to try some things out.  I looked through several of my bobbin lace books and found a little mat in my copy of "The Torchon Lace Workbook" (Bridget M. Cook).
Isn't that pretty?  And it's a fairly small project that only calls for 14 pairs of bobbins.  The pattern is called Scandinavian paperweight because the main stitch pattern is called Scandinavian holes (and fans - the fans are around the outside, Scandinavian holes on the inside). 

It took me several days to get everything together, pattern pricked, bobbins wound, etc. and I finally got started on it late Sunday night.  The very beginning was kind of a challenge but I got it started and the first section went easy as pie.  But now I've had to turn the pillow a quarter turn to start working on the second side and it's not working so well.

I haven't been able to do too much because I didn't get home until after 7pm but what time I've had has been spent undoing stitches.  I think I've made about 10 stitches and taken out about 20.  I've had a look back at the intro lesson on making this stitch so I think I understand where I was going wrong.  That'sto be considered the right direction.  I think.  I'll let you know.

I'm using my English bobbins that I handstained and spangled and wound using size 80 mercerized cotton.  It's not actually fine by bobbin lace standards (and lacemakers prefer to use linen thread which I don't have) but it's plenty fine for me.  This is the same stuff I used to knit the doilies with the quad zero knitting needles.  I like the way it holds its shape.

Speaking of cotton, I finally got a photo of the tahkli-spun cotton skein I finished this weekend.
I wish you could feel how squishy soft this stuff is.  It's not very consistent but that will improve with practice.  I ended up with about 69 yards our of 1/8 oz (2g) of cotton.

Thursday, February 2, 2012

Try, try again

This post is mostly about not giving up on things when they don't go right the first time.  Or the second time.  Or the... (you get the idea).

When I first started trying to spin with a tahkli spindle, it was a miserable failure.  So I put it away and decided that the tahkli spindle wasn't for me.  Part of the problem was not being able to do the long draw very well and part of it was managing the spinning of the spindle.

The next time I tried it, I at least got some yarn made but it wasn't very good.  In fact, I threw it away because it was so bad.

Then I've tried it several other times when I was trying to show people how it worked (in theory because I did more 'splainin' that spinnin').

In all my classes, I always tell people they have permission to suck at whatever they're learning because they don't know how to do it.  It's like Captain Picard said, "Things are only impossible until they're not."  Once they're not impossible (because we've invested some time in them) then they're possible.  N'est pas?

Recently I've been working with the beautiful support spindles my friend made for me and some angora fiber that I'd had in my stash for a while.  Like this, for example.  Working with this fiber and these spindles has helped me heaps in learning how to prepare my fiber and how to keep the spindle under control.

So the other day I got an email from a local teacher asking me to be involved in an arts day they're planning for local school kids.  I'd taken part in a program they did a couple of years ago at a local school and had a blast.  Now she's got some grant money and wants to "go big" with a Saturday gig at the Hoogeland Center for the Arts for kids from a lot of different schools.

I was thinking how fun it would be to do something with cotton since it's definitely something they can relate to and I have plenty that I can let the kids have a cotton seed and see it in the boll, on the seed, spun into yarn, and made into something.  It's educational and yet fun.  Of course that sparked me to pull out and dust off the old tahkli and give it another try.  I predrafted and opened up the fibers like I'd been doing with the angora and started to spin. 

It was like magic - it suddenly all came together in my brain and my hands and this is what happened:
 Over a couple of evenings (and early mornings), I spun a section about the size of the raw cotton on the right of the photo and got what's on the spindle.  Cotton goes unbelievably far.  I plied just a little strip of the yarn as a sample (which you can see in the middle).  The comparison sample is some size 12 perle cotton (on the far left).  Here's a photo to show the comparison of the two:
It has spun so fine and I swear to you it was all by magic.  Who said I couldn't do this?  I can totally do this!  If I play my cards right, this might be the perfect handspun cotton to knit a doily with.  I love it when a plan comes together....bwahahahahaha.

Sunday, January 29, 2012

The Bounciest Yarn

Last year when I was in Kentucky, I was given a Polypay fleece.  I was going to use it as my Tour de Fleece project but didn't get too far on it.  I've recently pulled it out again and started working on it again.  I put it through an initial wash last year but the tips were still quite dirty so I decided to flick open the tips and wash it in batches which has really done the trick. 
The stuff in the basket is how it came out when I washed it in large batches.  The stuff in the box is washed after flicking the ends open and ready to be combed.  Once it is combed, it's a loverly juberly fluffy mass.
I spun a little sample the other day and was shocked at how bouncy the sample was.  Just laid out, it was about 30 inches but it stretched to over 36 inches.  I took it to knit night so I could show everyone this bouncy yarn.  The funny thing is that, while you can really get some bounce when you card and spin a wool yarn worsted, you don't usually get that same kind of performance when the fiber has been combed and spun short draw.  This sample was combed and spun short draw and still had that kind of bounce.  This post has a picture of the lock (the one on the right).

I'm spinning it on my Kromski Minstrel on the 8.5:1 whorl so it's kind of medium speed.  As usual, I have it set up to spin with scotch tension and I've got a fairly hard draw in.  I'm trying to get enough twist in to hold it together well but not enough for it to lose its soft and bounce.  I am planning to ply using the next higher ratio of 12:1 to help that process, too.  I'm still learning a lot about ratio and how to use it to best effect so that may change once I get to that part of the process.
Right now I'm spinning it pretty fine, although I may try to 3 or 4 ply it for a heavier finished yarn.  I don't know, though. I think I like the lace weight.  I'll have to experiment a little with that, too.  I would love to have something made with it before I go back to Kentucky this year.  Wouldn't that be fun? 

On the knitting front, I finally made the big step and ripped back the body on the bohus.  I ended up decreasing by about 30 stitches which should equate to about 5 inches and I think it's going to be much better now.  From the finished body, here's where I am now:
I never seem to be able to get a good photo of this sweater but here's where I'm at.  I got about 3-4 inches done this weekend and, of course, the stockinette goes really fast in the round so I think now that I've got it working, it won't take long now.