Showing posts with label pattern. Show all posts

Wednesday, March 2, 2016

Beading Your Purse

The other night I was looking for something in my home office and found this little beaded coin purse that I'd made about 10 years ago.
After posting it on Facebook, I had a request for the pattern.  It's a really basic beaded purse pattern that you can adapt to fit whatever size purse frame you have.  These purse frames can usually be found at chain craft stores, although you can also find them online.

You can also find kits to made this type of coin purse at some craft and/or knitting stores or online but it's just as easy to buy a spool of perle cotton and some strands of pre-strung seed beads.

So here's how I made mine.  This is a "down and dirty" pattern, written out from looking at my purse. Make, do, change to your heart's content and to fit your own purse frame.  And, most of all, enjoy!

Beaded Coin Purse
  • Size 8 perlé cotton (with beads loaded – load as many beads as you can manage since you’ll have to cut the thread to load another set of beads and then make a join.)
  • Size 10 or 11 seed beads (pre-strung strands of bead make it easy to transfer the beads onto the perlé cotton.  You’ll use approximately 3,000 beads. The easiest way to transfer the seed beads to the perlé cotton is to make a loop at the end of the sewing thread holding the beads and rest the end of the perlé cotton through the loop.  This will allow you to slide the beads from the sewing thread onto the perlé cotton.)
  • Size 0 or 1 knitting needles
  • Lining material
  • Purse frame

Piece is worked flat and then stitched together when attached to the purse frame.  This may not be the best project for working on the move. 

For the smaller coin purse frame, I cast on 28 stitches. Knit 2 rows without beads.  This will give you an edge to attach to the purse frame.

Basic row: K2, *slip 1 bead, K3* (repeat across to last 2 stitches), K2

Every row will be knit in this manner, the only difference being the number of beads you slip.

Work the basic row 2 times slipping 1 bead.
Work the basic row 4 times slipping 2 beads.
Work the basic row 4 times slipping 3 beads.
Work the basic row 90 times slipping 4 beads.
Work the basic row 4 times slipping 3 beads.
Work the basic row 4 times slipping 2 beads.
Work the basic row 2 times slipping 1 beads.

Knit 2 rows.  Bind off.

Using the lining material, cut a piece a little larger than the purse.  Shape the ends to match the curve of the purse frame.  Sew the lining, making sure to leave enough of the side open to accommodate the purse frame. 

Sew the sides of the knitted purse together, leaving enough of the side open to accommodate the purse frame.

With the wrong side of the lining facing the wrong side of the knitted purse, fold in the lining to hide the edge of the material and stitch the pieces together.


Attach the purse and lining to the purse frame, making sure there is room for the frame to open and close.

Wednesday, February 17, 2016

And I WROTE the damn thing

Back in 2007, I wrote a blog post about a sweater that I put together based on one that a TV character was wearing.  In case you missed it, here's the link.  I ended up making 2 sweaters using the natural white Fisherman's Brand Wool from Lion Brand.  I love the pattern and, in fact, I wore one of them on Sunday when I was shoveling snow and never felt a bit of cold.  I love it.

Last year I bought a beautiful Valley Yarns burgundy wool for a project that I later decided not to make.  I thought it would be perfect for a new jumper and I knew just which pattern I wanted to use - the pretty man sweater.

One thing to keep in mind that this is a pattern that I wrote and have made twice.  That will be important later.

I downloaded the pattern and made an adjustment right away.  The fisherman's rib, or brioche stitch, is a very stretchy stitch.  It's effectively a double knit stitch and has a huge amount of give to it.  In my pattern, I didn't use any sort of rib on it but then I had issues with the cast on being too rigid.  This time I decided to start with a provisional cast on that will allow the garment to stretch to its heart's content before I go back and add whatever I'm going to add for the bottom edge.  That should give it a better edge.

All's good, I got it started and knit to the armhole shaping.  This particular pattern has raglan sleeves outlined by a simple cable.  As I started this shaping THE FIRST TIME, I goofed and decided to add the decreases on the wrong side since I was doing the cables on the right side.  It wasn't until I'd got through the 3rd cable crossing (18 rows in) that I realized that doing the decrease on the wrong side was the wrong thing.  All the nice stitches was on the inside with the decreases.  The outside didn't look terrible but it wasn't right.  So I ripped it out to the beginning of the cabling.  Not a terribly easy thing with this stitch but I did it because it was the right thing to do.

OK.  Got it ripped out and back on the needles and started off again.  I got to the 5th (30 rows in0 cable twist when I realized it wasn't shaping right.  It has narrowed too quickly and I was running out of stitches.  This happened last night when I had sat down to knit 2 simple rows before I went to bed.  It was late.  I realized I hadn't paid attention to the pattern.  I got cocky and didn't look at the pattern.
So I pulled it up and, sure enough, I was supposed to decrease every 4th row, not every 2nd row. Even I know that will make a difference. My question is, how could I have not known this?  How did I not even look at the pattern?  I wrote the damn thing!

Thursday, December 3, 2015

Design Challenges

As you begin to design your own projects, the first thing to let go of is your pride.  I'm talking about pride in the sense that you can't admit a mistake and make it right.  Perfectionism.  It can sometimes be rooted in arrogance but I think it's more often rooted in lack of confidence.  It can't exist for a designer.

To design something, you may see it very clearly in your mind's eye or you may see as through a glass darkly.  Either way, it's always likely (to the point of being probable) that you are going to go down avenues that just don't work.  It just doesn't give you what you want so you have to back up, take stock and try another route.

As a very simplistic example, take my chunky & lace cowl.

I used a US size 4 needle for both the lace weight yarn and the  heavier yarn because it was a good size for the lace and it was okay for the other.  In fact, it worked great for the beginning section where I was alternating between the two yarns but as I began to work the solid section with the heavier yarn, I realized it wasn't working.  The fabric was way too thick and rigid.  

With the yarn that I'm using, it will felt naturally as the cowl is worn.  If it felted with the fabric as thick as it was, it would stand up all on it's own!  That's great if you're building a house.  You want your creation to stand on it's own if you're building a house.  When you're making a cowl, on the other hand, it's not the most desirable quality.  You want it to be soft and drapey, with plenty of give and stretch to it.

So I was here:
You can see that I'd worked a good 6 inches or so of the heavier yarn by the time I realized it wasn't right.  In fact, I kept knitting for quite a few rows after I knew it was wrong.  I'm still not sure why but this is where I ended up.  

I ripped back until I was almost back to the last lace panel, picked up the stitches with a US size 7 needle and started back.  Soooo much better and I'm so glad that I wasn't afraid of giving up the time I'd put into the project so I can end up with something I really like and that works from a design standpoint.

So now I'm back to here:
But now I can knit content.  

Before you ask, I did adjust the number of stitches to accommodate for the larger needles.  Three needle sizes would have made it way too large so I decreased about 16 stitches around (about 10% - there were 160 stitches in all).  This should bring it back into line to what it was although I may need to decrease a few more in the next few rounds.

A word to the wise, if you have to rip out a whole lot of rows/rounds, the best thing to do is roll the project up list you see here, take the needles out and then rip out your rows/rounds.  The reason this works so much better is that it keeps the fabric in control and so makes less mess with the open stitches.  If you just start ripping out willy nilly, you'll find that some stitches will ladder into lower rows/rounds and it will make the process of getting the stitches back on the needle that much more difficult. It's much more gentle on the fabric and the open stitches.

Friday, November 27, 2015

What to do with fractal spinning

I'm in the middle of an experiment with fractal spinning.  Check out this post for what that means, in case you missed it.  I finished the spinning last night and got the skein washed so it now looks like this:
Pretty but to me it's hard to tell any difference between this and any other plied yarn spun any other way.  Maybe after it's knitted, I'll be able to tell the difference.

So I started knitting.  Again, it's kind of hard to tell the difference but I like it nevertheless.

The scarf I started with it is 43 stitches wide and worked in a basket weave pattern.  Because knit stitches are wider than they are tall, I made the stitch pattern 5 stitches wide and 6 rows long.  In case you'd like to knit yourself (or someone else) an interesting scarf, you don't need fractal spun yarn, any good sport to DK weight will do.  I'm using US size 4 needles because my yarn has thicker sections and thinner sections.  For my yarn, these create a nice fabric.

I casted on 40 stitches and worked knit 2, purl 2 ribbing for about 8 rows before I started the pattern.  On the first row of the pattern stitch, I increased 3 stitches across to end up with 43 stitches.

Pattern stitch
Row 1: K2, P2, (K5, P5) repeat bracketed stitches to last 4 stitches, P2, K2
Row 2: P2, K2, (P5, K5) repeat bracket stitches to last 4 stitches, K2, P2

Repeat Rows 1 & 2 twice more

Row 7: P2, K2, (P5, K5) repeat bracket stitches to last 4 stitches, K2, P2
Row 8: K2, P2, (K5, P5) repeat bracketed stitches to last 4 stitches, P2, K2

Repeat Rows 7 & 8 twice more

Repeat these 2 sections until your scarf is the length you desire (or your yarn is almost finished) and end with 8 rows of K2/P2 ribbing.  You'll need to decrease 3 stitches on your last pattern row.

Once its washed and blocked, you'll be able to see the basket weave pattern much more clearly but even if you don't block it, I think it's still got an interesting light texture.

I'm not sure how much yarn I ended up with so I'm not sure how long the scarf will be but I don't think it will be very long.  I think this pattern would work really at any length but I think it would be best as a short or medium length.

Friday, November 6, 2015

Braids galore

I've started work on my first personal knitted item in quite a while. I've been tied up preparing and conducting classes and so haven't had much to share (except that in pulling material for my cotton spinning class, I found my long last tahkli spindle - yea!!). What spinning I've been doing has been for gifts that I don't want to post for fear the recipient will see it. So that's left me very little to post.

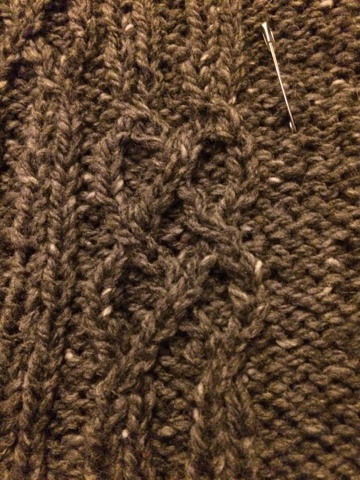
Now, however, I've got a really fun design project going on. It's a cabled poncho that is going to have a pointed front and a square or rounded back (haven't made up my mind just yet on that part. 
It will also have a wide-ish cabled edging around the outside to finish it off. 
I've used the chunky braided cable up the middle and a narrower stepped braided cable up either side of the middle braid. 
I am really pleased with the way it's laying out. 

This is actually the second version. I got about halfway to this size with my initial attempt and didn't like it at all. It didn't lay right and I just wasn't happy so out it all came and, using lessons learned, I came up with this. 

If you're wondering about the safety pin, I'm using it to keep track of which side of my braided cable I'm twisting. 

Friday, November 28, 2014

Be prepared

The latest snow and cold made me realize that I needed to start beefing up my winter warmies. (Warmies to include those made with acrylic yarn.)

Chunky yarn + size 8 needles = fast and easy hat. 

This is a quick pattern that I designed last year. 

Start with a 4-stitch I-cord and make it long enough to tie a little knot in it. Then transfer them onto 4 double points (or two circs) and increase every stitch so that there are 4 stitches on each DP.  These represent 8 sections of 2 stitches each. 

Make sure to work a knit row every other round. 

On the increase rounds, increase at the beginning of each of the 8 sections until there are 13 stitches in each section. Increase more for a more slouchy hat and  fewer stitches for a less slouchy. 

Knit even in stockinette until the hat is as large as you want it. 

On next round, decrease once every 5 stitches (or as many as it takes for band to fit snugly). Work in K2/P2 ribbing for 2-3 inches if you want a single band or 4-5 inches if you want to turn up the band. 

Do a stretchy bind off and BAM you have a hat. 

Saturday, March 1, 2014

Mad Scientist at Work

Last week at knit group, several people were working on thrummed mittens which were so amazing.  If you’ve never encountered this technique, it involves knitting in tufts of roving.  We started talking about the other things you could make using this technique, like a lap blanket or slippers.

Two days later I got an email from a local yarn shop that featured a pattern for thrummed slippers.  The slippers themselves didn’t look hard, in fact they looked a lot like a vintage pattern I’ve been carrying around with me almost since I first learned to knit.  I’d never made them but the pattern was paired with a pair of gloves that are knitted flat, which was why I kept the pattern.  One of my knitting buddies said it looks exactly like the slippers she learned to make back in the day in 4H.

It wouldn’t be any big deal to incorporate the thrums into this pattern.  To try it out, I used the left over handspun from my poncho, Border Leicester fleece locks, and some roving.

The first thing to do was to try out the pattern so I could figure out how it works.  It turned out to be super easy.  Here are the basics:

The one on the left is inside out and the one on the right shows the roving
in the space between the slipper and the second sole
.
 
(I used worsted weight yarn and US size 6 needles.)

Cast on 43 stitches.

Row 1 – K4, P1, K33, P1, K4.  (The outside edges end up folding down around your ankles.  If you want them to come up further on your feet, you simply increase the number of stitches between the purls.  But keep track because you’ll need to center the “sole” stitches on the next row.)

Row 2 – K16, P1, K9, P1, K16

Repeat these 2 rows until piece measure 3 ½ inches from the beginning.

Next row: Bind off 6 stitches, K31, P1, K4.

Next row: Bind of 6 stitches, K9, P1, K9, P1, K10

Next row, work in K1, P1 ribbing over 10 stitches, K11, work in P1, K1 ribbing to the end

Next row, work in K1, P1 ribbing over 10 stitches, P1, K9, P1, work remainder of stitches in rib pattern.

Repeat these 2 rows until it measures the length of the foot but don’t bind off.  Cut the yarn leaving a 14-inch tail.  Using a tapestry needle, run the yarn through the live stitches and pull the yarn through all the stitches and pull tight.  Work in the yarn.

So I discovered that the section between the K9 of the original 2nd row was the bottom of the foot.  That’s where I needed to include the thrums.  I guess you could add them to the entire inside but the wool locks I was going to use for the thrums are quite long stapled and would wrap up around the sides.

On the first slipper I made, I interspersed the thrums 3 across the 9 stitch area and then staggered 2 across 4 rows later.  But I thought it needed a little more fullness so on the second one, I put 3 thrums across on each row.

I also changed the way I closed up the back seam.  The instructions say to sew the edges and then draw the 9 stitches of the bottom together.  On the second pair, I picked up 9 stitches along the back and knit a triangle inset to make the heel a little squarer.  Gathering the stitches made a bump in the back that wasn’t very comfortable.

I finished them and really liked where they were headed but, since today is the perfect day to try out warmy, cozy slippers, I realized they needed a little more on the bottom.

So I pulled out the chunky handspun from my leftovers and knitted an attachable sole.  To add to the cush and the warmth, I decided I would also pack the pocket between the new sole and the bottom of the slipper with wool roving.  Ain’t no cold getting’ near my tootsies with these suckers!

Thursday, November 28, 2013

Catching up

Things have been so busy this year that I've been really inconsistent with posts.  But now that I've got a little time off, not only am I going to post, I actually have things to post about and have time to take the photos.

First.  Natural color fair isle sweater.
One of the projects I've had on my plate for a while now has been spinning yarn for a fair isle sweater using natural wool colors.  Quite a while ago, I finished a large hank of chocolate colored wool (which, of course, I can't find now but it will turn up).  Just this past week or so, I've finally finished 2 other of the colors.  I thought I would use a natural white for the background color and an Ashland Bay "Apple Green" color for the "pop" of color.

 The 2 skeins are the ones I finished this week, the brown and the white are the fiber for the other yarns and the green is the apple green.  I've got almost 2 full bobbins of singles of the white finished and about half a bobbin done of the green so I'm not all that far off.  Of course, the freezing weather is giving me a lot of incentive to get the yarn finished so I can get started on the sweater. 

Another project I got finished was a cloud of fiber I bought recently at the Bishop Hill Spin In from Fae Ridge Farms in Iowa.  I've done a number of these clouds from her.  She uses a number of types of fiber, each of which takes the dye differently and she adds some interesting highlights to give the spun yarn a lot of depth and texture.  See what you think:
It didn't make a lot of yardage but I'm interested to see what it will decide it wants to be.  This is one of those yarns with an opinion.  It's completely useless to try to decide what to make from it because it will only be what it wants to be.  Once it makes up its mind, though, watch out!!

And finally, this.
A friend of mine told me a few weeks ago that he wanted a scarf for the cold weather so when I was looking through the stash and found this yarn, I decided it would be perfect for him.  It's Elspeth Lavold Silky Wool in 2 shades of gray.  But I wasn't sure what pattern to use.  That's when it's time to go to the stitch dictionaries.  I knew I wanted something that would be reversible and something I wouldn't have to worry about having a pattern in front of me all the time.  When I came across this pattern, it just reminded me of the number of knitting geniuses there are.  It's simple and elegant and here's what it is:

Row 1:  Knit 3, purl 3 across the row.  It's a 6-stitch repeat so I cast on 48 stitches.
Row 2: Knit 1, purl 1 across the row.

Repeat the 2 rows.

That's it.  That's absolutely all there is to it.  It allows for a nice transition from color to color, it's reversible and it's an interesting texture.  What more could a guy ask for?  Right?

Now I'm off to keep knitting and to finish the flax I'm spinning for a friend and to finish the white for my sweater.  Of course, it would be nice to find the dark brown, too.

P.S. The project bag is from my friend, Karen at Karen Poulakos Studios.  If you're anywhere near Arkansas, she'll be at the Arkansas Fiber Arts Extravaganza on December 5-6.  She's got some great project bags, knitting needles and other fun stuff.

Wednesday, October 10, 2012

Too cute to count

I had no idea it had been so long since I've posted.  There's just too much to keep up with. 
Here's one thing I've been waiting to share.  I didn't want to post this until the expectant mommy got her care package. A friend of mine is having a baby very shortly and I've been working on things since I first found out.  There was a blanket (of course, from a vintage pattern) and then this little outfit. 

The jacket is my take on a vintage baby pattern that I call Baby Seed Jacket.  The original pattern was written using Berroco Comfort but since I couldn't find any of the Berroco, I decided to use Encore.  It's the same weight, fiber makeup, etc.and it proved to be a successful substitute.  I think the Comfort gives better stitch definition and I would still chose to use it if I had a choice but this was fine.  You can't tell from this picture but this was a variegated heathered yarn that went from a light pink to a light grey and I was concerned about how long the color changes were.  I still prefer the shorter changes of Berroco but, again, this was fine.

There were supposed to be 2 rows of buttons but the button holes were too far down so I decided to add a faux row.  That is, I sewed the buttons on top and added snaps underneath.  I like using snaps near the neck because the buttons can come out of button holes with the moving baby and the snaps just make it a little more secure and less fussy.

I had only written the pattern for the jacket.  But I'd bought 2 balls of yarn and used only a little bit of the second ball.  I decided I had to have a hat.  So I cast on and made the hat.  I still had yarn left over so I decided I had to have booties.  And, ya'll, I love these booties beyond all reason.  the cuff can fold up or fold down, and they're actually shaped more like a little shoe.  I decided to work the heel a little differently.  I'm sure someone will jump up and say, "That's a so-and-so heel!"  But I just made it up because I thought it looked more like a shoe than a sock and this method seemed to work the best for that. 

I decided to knit the heel straight down using the stitches from 3 of the 4 needles (3/4 of the stitches, if you're using circs or magic loop).  Once I got to the bottom, I knit the stitches of the back needle in garter (for the sole) and at the end of each row, I knit 1 stitch from the back needle and 1 stitch from the side needle together.  That bound off the stitches of the side needles and that was my heel turned.  Then I started knitting in the round again by knitting the sole stitches in garter, picking up stitches from the side edge, knitting the top needle stitches and picking up stitches on the other side.  That gave me my heel turned and my foot stitches.

On the toe, instead of decreasing like a sock, I decreased on the top only, which gives a shaped toe but leaves the sole flat, like a shoe.  I really love how they came out.  If you want to try the Baby Seed Booties, here's the pattern.  At some point, I'm going to add the bootie and hat pattern to the jacket pattern but I haven't gotten that done yet.  In the meantime, enjoy:

Baby Seed Booties

2 skeins worsted weight yarn like Encore                  1 set US size 4 (3.5mm) straight needles
1 set US size 4 (3.5mm) double pointed needles      Tapestry needle (for finishing)
2 buttons (for cuffs)

Using straight needles, cast on 32 stitches.  Knit 10 rows in seed stitches (K1, P1, repeat across)
Left bootie: Bind off 6 stitches and knit across row, distributing stitches on double pointed needles this way: needle #1 – 6 stitches; #2 – 6 stitches; #3 – 8 stitches; #4 – 6 stitches.  (needle with 8 stitches forms the heel and, eventually, the sole)
Right bootie: Knit to end.  On next row, bind off 6 stitches and distribute remaining stitches on double pointed needles this way: needle #1 – 6 stitches; #2 – 6 stitches; #3 – 8 stitches; #4 – 6 stitches. (needle with 8 stitches forms the heel and, eventually, the sole)
Knit 16 rounds.

For the next section, you will use the stitches from all the needles except needle 1 (top of foot where flap is).

Distribute the remaining 20 stitches on 2 needles (10 stitches each).  (You can leave them on 3 needles but I find it easier to manage on 2 needles.)
Work 10 rows in stockinette stitch.

Knit to end.

The next section is going to form the heel part of the sole and turn the heel.  The sole of the bootie will be in garter stitch and the rest in stockinette.

Row 1: P6, K7, K2tog.  Turn.
Row 2: Slip 1, K6, K2tog. Turn.
Repeat Row 2 until all side stitches have been used. (8 stitches remaining)

You’ll now begin working in rounds again.

Round 1: K8 on one needle.  With the next needle, pick up 7 stitches along the side of the heel.  On the next needle, knit the 6 stitches that were being held in reserve.  On the last needle, pick up 7 stitches along the side of the heel.
Round 2: P8 on the “sole” needle, knit around.
Round 3: K8 on the “sole” needle to maintain the garter stitch pattern, knit around.

Repeat Rounds 2 & 3 five more times (12 rounds in all).

Begin decreases for toe.  You may find it easiest to keep sole stitches on 1 needle and divide the remaining stitches between 2 needles (10 stitches each).

(Remember to keep the sole stitches in garter.)
Round 1: Knit (or Purl) 8, next needle - K6, K2tog, K2, next needle – K2, SSK, K6.
Round 2: Knit (or Purl) 8, next needle – K5, K2tog, K2, next needle – K2, SSK, K5.
Round 3: Knit (or Purl) 8, next needle – K4, K2tog, K2, next needle – K2, SSK, K4.
Round 4: Knit (or Purl) 8, next needle – K3, K2tog, K2, next needle – K2, SSK, K3.
Round 5: Knit (or Purl) 8, next needle – K2, K2tog, K2, next needle – K2, SSK, K2.
Round 6: Knit (or Purl) 8, next needle – K1, K2tog, K2, next needle – K2, SSK, K1.
Round 7: Knit (or Purl) 2 together, K6, SSK, next needle – K2tog, K2, next needle – K2, SSK.
 
Kitchener the toe stitches together.

Wednesday, July 25, 2012

And Finished

Just wanted one more shot of the finished sweater.  I just found out about another baby boy on the way so I'll definitely be using this pattern again.

Sorry, for some reason the photo wants to be upside down!  There's no fathoming the ways of mobile posting.  We're knitters, though, so we can adjust.  Ha!


Sunday, July 22, 2012

Baby steps

For some reason, I'm finding it very hard to focus on blogging lately.  It's not that I've forgotten you. I'll try to do better.

In the meantime, here's the next step in the baby stuff.  This one's for wee Mason in Florida.  It's probably going to be big for him right now but hopefully will be ready for him as things cool down a little.

The yarn is Plymouth Yarn Jeannee. 51% cotton and 49% acrylic so it can be washed and dried easily and it will be a little better for the warmer climate. I don't know if the yarn is even still made because I've had this in the stash for quite a while and I only had 1 skein each of the 3 colors.  Not really sure why I had these particular colors but I ended up with just a few yards of 2 of the colors left over and none, really of the dark green left over.  It still needs button but I wanted to get a quick photo done before I go on my next trip.  I may add pockets, which was in the original plan, but I think I just like it like this.

If you could see it in person, you would see that it doesn't have button holes.  I've decided since this yarn is pretty thick and is half cotton, buttonholes would tend to stretch.  So I'm going to put snaps on and just sew the buttons on top.  I think they're easier to manage like that anyway but it will also mean I can do fun buttons that don't always work well with buttonholes.  I do plan to write this pattern out and will probably just publish it here instead of doing a proper pattern for it.  We'll see how much time I get to formalize the pattern. I actually went through several different iterations of this with different yarns.  I just couldn't get happy about the other yarns I was trying and finally came across these in the stash.

It's actually pretty easy.  I cast on 96 stitches (with US size 5 needles) and did K2/P2 ribbing for about 8 rows.  I don't know what the gauge is but the yarn is worsted weight.  After the ribbing, I knitted stockinette stitch until the piece was 7 inches from the beginning.  To shape the armholes, I knitted across 20 stitches, bound off 6, knitted until there were 26 stitches left, bound off 6, and knitted 20 stitches.

From this point, each section had to be worked separately.  I decreased stitches at the armhole twice on the knit row and at the same time started decreasing on the neck side.  I continued to decrease on the neck side until there were 12 stitches on the needle and then I knit straight until the armhole was 3 inches and then I bound off the 12 stitches. 

On the other front, do the same thing, On the back, I did the 2 decreases each side of the back (4 stitches decreased in all) and then knit straight until the back matched the front.  On the last 2 rows of the back, I bound off 12 stitches at the beginning of each of the rows and put the remaining stitches on a stitch holder ready for the band.

I sewed the shoulder seams and picked up for the band.  I didn't count but I did a strict pick up 3 stitches on 3 rows and skipped a row.  This is a pretty good way to make sure it lays properly.  When I got to the stitch holder, I knit those off and picked up the same number on the way back down the other side.  I did K2/P2 rib for 6 rows but I wish I'd done it for 8 to match the bottom band.  See what you like.  Then I bound off in the stitch pattern.  Remember, I didn't use buttonholes so if you would rather include them, I would recommend no more than 3 or 4 along the band, evenly spaced, inserted on the second of the K2/P2 rows.

For the sleeves, I cast on 40 stitches and did the ribbing for 2.5-3 inches.  I like to have the band longer on the sleeves so they can be rolled up if necessary and still look well.  After the ribbing, I increased 4 stitches along the first knit row then I increased 1 each side of the sleeve every 6th row until I had 50 stitches.  I knit the sleeves until they were 6 inches from the middle of the ribbing section.  In other words, I folded the sleeve at the ribbing and used that as my beginning point.

I did the same sleeve decreases as for the body (3 on each side followed by 1 decrease each side on each of the next knit rows).  Instead of knitting the final purl row, I bound off on that last row.  On my model, one more purl row was going to make the head of the sleeve just a little bigger than I wanted.  To adjust this in future, I'll probably do the sleeve increases to 48 stitches and include the final purl row (if that makes sense).  I think the sleeve with fit a little better that way.  It's okay but I think it would lay a little better with that little adjustment. 

After that, I just sewed the sleeves in and worked all the ends in and it was done!  Very quick, very easy and would look great with a little fair isle pattern or worked in a variegated yarn so you don't have all the ends.  Just a fun, basic sweater.  I hadn't planned to put all this in tonight, but might as well since it's all fresh in my brain.  Have fun with it.

That's 2 babies down (the other one is getting delivered this next week) and now for the next one.  I'm glad I've got some time to get the things done I've got planned.  Hehehe.

Sunday, January 3, 2010

Trying my hand at hats

I've never made many hats because I tend to look really stupid in hats.  But a friend of mine at work is going through chemo and I told her a couple of weeks ago that I'd make her a hat.  I know there are a gagillion cute hat patterns out there but the truth is, in case you didn't know it, I'm a bit lazy about looking for patterns.  The other reason I tend to not look at patterns too much is because I get overwhelmed by the choice and end up frustrated and unsatisfied.  But I did have to know how many stitches to cast on so I found one pattern for that purpose and started off.

Remember the carriage slippers?  I've been really interested in this honeycomb stitch which I've since found repeatedly in the vintage pattern books.  I thought that might make an interesting hat pattern so I went to Hobby Lobby and found a skein of naturallycaron.com's Spa yarn (an acrylic/bamboo mix) in the color she wanted and went to work.  Here what I came up with:


Cute, no?

In fact, it fit so well that I decided to make one for myself.  The Spa yarn was very soft but very, very splitty and I've got a whole roomful of handspun yarns now so I went shopping in the back room and came up with a skein of Merino/Yak that I spun early last year after I got my little Kromski wheel.  I estimated using about 200 yards of the Spa and a look at the tag on this skein showed I had 190 yards.  That's gotta be close enough.

Close only counts in horseshoes and handgrenades - and hats, apparently!


The true color is somewhere between these two photos.  It's incredibly luscious and covers my really uneven spinning wonderfully!

You probably can't tell in these pictures but I put a little tie on hers but not on mine.  Since she has to wear it all the time, I wanted her to be able to adjust it if she needs to.  Either way, I'm very pleased with it.

The pattern is available for free download from my website but I'll give you a bonus.  If you choose to work this in two colors (like the carriage slippers) you should work the first 4 rows of the pattern in one color and the second four in the other color.  Your main color will be pulled up through the contrasting color on the slipped stitches.  That should make sense when you've seen the pattern but there's nothing at all difficult about it.

Saturday, May 23, 2009

Vintage Rocks Baby Pattern

In case you're interested in trying it, I've posted the pattern for the baby sweater on my website. Click here to download it.

Wednesday, January 28, 2009

If I start going to the Opera I might as well be ready..

I saw a pair of long gloves the other day and started thinking about how much scope there would be to designing a pair of long gloves. I found some Misti Alpaca Lace (natural dark tan - groovy color name, isn't it? I call it 'camel' colored) in my stash that I’ve been so wanting to make something with and it’s perfect for this project. Soft, elegant, alluring, takes the lace part well and gorgeous!

Don't have photos yet but will try to get those posted tomorrow. The idea is for the gloves to have a lacy pattern on the back of the hand then gently decrease to the wrist. At the wrist will be some open lace and I'm thinking some special beads so that it looks like a bracelet round the wrist. The gloves I saw actually had a sparkly bracelet around them on the wrist but I thought, why not just work them into the glove? Right?!

Then they will continue up the forearm with the lace pattern worked all the way around the glove. I think. Maybe just the top but I think all the way round. I certainly wouldn't need to do any increasing to accommodate the line of the arm as the lace would automatically do that for me.

I love the feel of the laceweight for the glove and the alpaca is super soft and very warm. The glove I'm doing right now is really a "work out the pattern" glove and I will make the real pair once I've got everything worked out here.

I keep telling everyone these are for all those 'black tie' events I go to in Springfield, Illinois! Ha!! Well, I now have an Opera Hood and I'll soon have long gloves so carry on!!

Monday, November 12, 2007

From anywhere...and anytime

Inspiration also comes at the weirdest times. Sitting in church the other morning, I was looking at the stained glass and the column shapes and happened to wonder what a certain stitch pattern would look like. At first I thought it might look good as a summer top but then I wondered what it would look like as a scarf. When I got home I did a quick swatch and fell in love with it. In St Louis a couple of weeks ago I bought some beautiful yarn that I thought would work great. Actually, the yarn was bought for a scarf for my Mom for Christmas (sorry, Mom – you can have the pattern!). Here’s what happened! Easy and cute, what’s not to love? It still needs to be blocked but I love how it looks. Here's a picture of the scarf and a close-up of the stitch pattern.