Showing posts with label design. Show all posts

Thursday, December 3, 2015

Design Challenges

As you begin to design your own projects, the first thing to let go of is your pride.  I'm talking about pride in the sense that you can't admit a mistake and make it right.  Perfectionism.  It can sometimes be rooted in arrogance but I think it's more often rooted in lack of confidence.  It can't exist for a designer.

To design something, you may see it very clearly in your mind's eye or you may see as through a glass darkly.  Either way, it's always likely (to the point of being probable) that you are going to go down avenues that just don't work.  It just doesn't give you what you want so you have to back up, take stock and try another route.

As a very simplistic example, take my chunky & lace cowl.

I used a US size 4 needle for both the lace weight yarn and the  heavier yarn because it was a good size for the lace and it was okay for the other.  In fact, it worked great for the beginning section where I was alternating between the two yarns but as I began to work the solid section with the heavier yarn, I realized it wasn't working.  The fabric was way too thick and rigid.  

With the yarn that I'm using, it will felt naturally as the cowl is worn.  If it felted with the fabric as thick as it was, it would stand up all on it's own!  That's great if you're building a house.  You want your creation to stand on it's own if you're building a house.  When you're making a cowl, on the other hand, it's not the most desirable quality.  You want it to be soft and drapey, with plenty of give and stretch to it.

So I was here:
You can see that I'd worked a good 6 inches or so of the heavier yarn by the time I realized it wasn't right.  In fact, I kept knitting for quite a few rows after I knew it was wrong.  I'm still not sure why but this is where I ended up.  

I ripped back until I was almost back to the last lace panel, picked up the stitches with a US size 7 needle and started back.  Soooo much better and I'm so glad that I wasn't afraid of giving up the time I'd put into the project so I can end up with something I really like and that works from a design standpoint.

So now I'm back to here:
But now I can knit content.  

Before you ask, I did adjust the number of stitches to accommodate for the larger needles.  Three needle sizes would have made it way too large so I decreased about 16 stitches around (about 10% - there were 160 stitches in all).  This should bring it back into line to what it was although I may need to decrease a few more in the next few rounds.

A word to the wise, if you have to rip out a whole lot of rows/rounds, the best thing to do is roll the project up list you see here, take the needles out and then rip out your rows/rounds.  The reason this works so much better is that it keeps the fabric in control and so makes less mess with the open stitches.  If you just start ripping out willy nilly, you'll find that some stitches will ladder into lower rows/rounds and it will make the process of getting the stitches back on the needle that much more difficult. It's much more gentle on the fabric and the open stitches.

Wednesday, November 25, 2015

Trial and Error

Sometimes you just have to keep trying until something works.  That's been especially true with the edging for the poncho.  I don't think I've ever had such a time with a design.

I started the edging with an I-cord that was supposed to be the outside edging but as I worked it, I realized that it was pulling in on that side so that would need to be the side attached to the body.  Fine, no problem.  That would give a nice flow from the body to the edging.

I did a light block on the body and as I worked the edging, I would lay the edging around to see how close I was to getting it long enough.  When I got close to what I thought was the finish, I started attaching the edging to the body so I could knit to the very end and have a nice tight finish.  But when I  got to the end of the edging, it looked like it was way short.  What?!

I thought the edging I had should have fit almost all the way around but I kept knitting, adding another 8 inches or so until it went all the way around.  Great, right?  Well, great until I tried it on and found that the edging was all wavy.  Arghhhhh!!!!!

I then had to take the edging completely off (about 110 inches of edging, by the way) and re-attach with better spacing.  Once I did that, I then had to rip out about 6 inches of the edging that I'd knit before, taking into account that I needed to make the braid from the beginning flow into the braid at the end.

Done.

Good.  Now I needed to figure out what to do with the outside edge to finish it off.  It was really rough so I decided to crochet around the edge to give it a little form but it needed something else.  I only had part of one skein of yarn left so I had to be a little careful.  As an old crocheter, if all else fails, use a shell stitch.  So that's what I did and it worked perfectly.  Here's the final product that is worth all the hassle of making sure it was right in the end.

 
Of course, it ain't over till the blocking's done.  Sometimes it makes all the difference.

It ended up being the perfect length and the perfect circumference.  Some of that was guess work and some of that was experience and some of that was pure old trial and error.

Friday, November 6, 2015

Braids galore

I've started work on my first personal knitted item in quite a while. I've been tied up preparing and conducting classes and so haven't had much to share (except that in pulling material for my cotton spinning class, I found my long last tahkli spindle - yea!!). What spinning I've been doing has been for gifts that I don't want to post for fear the recipient will see it. So that's left me very little to post.

Now, however, I've got a really fun design project going on. It's a cabled poncho that is going to have a pointed front and a square or rounded back (haven't made up my mind just yet on that part. 
It will also have a wide-ish cabled edging around the outside to finish it off. 
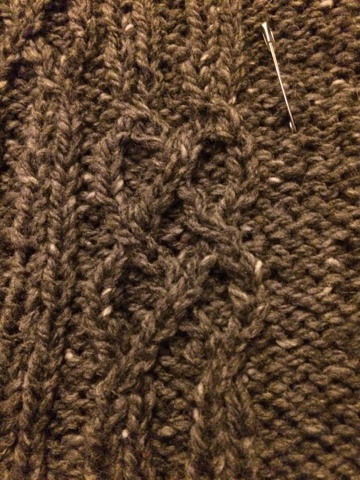
I've used the chunky braided cable up the middle and a narrower stepped braided cable up either side of the middle braid. 
I am really pleased with the way it's laying out. 

This is actually the second version. I got about halfway to this size with my initial attempt and didn't like it at all. It didn't lay right and I just wasn't happy so out it all came and, using lessons learned, I came up with this. 

If you're wondering about the safety pin, I'm using it to keep track of which side of my braided cable I'm twisting. 

Sunday, January 27, 2008

Design Exercise

One of my favorite design exercises is to find an interesting item or an interesting yarn and try to design something around it. I thought it might be fun to blog through the process.

As an example, I’m going to design a purse around this beautiful piece of coral.

I found this recently at La Bead Oh, my local bead shop. I spent the afternoon just sort of mulling over the shape and color of the coral, trying to imagine how it could be used. I worked on a couple of simple sketches to experiment with what I would need to do to make it look like what I see in my head.

Speaking about sketching designs, don’t worry if you’re at the stick man stage. I’m not too far off that. I like to keep unlined index cards around to sketch on. They’re easy to carry around so I don’t lose an idea if I’m out and about and they’re pretty inexpensive and easy to just file away ideas. Sometimes ideas like to bake a bit before they’re ready to come to life. If you’re like me, don’t count on remembering them!

Here are a couple of things I was thinking about:

I could see the coral being used as a closure of some sort, either as the hook or as a bar for a closure to fit over. After thinking about it more, I came up with this, using the coral as a button with a square "buttonhole."


The next thing I have to consider is what I’m going to use the knit the purse. A couple of thoughts I’ve had were to use some natural colored linen yarn I’ve got on hand. That might contrast nicely with color of the coral. But it would need a nice shape to keep it from looking dull.

The coral is very reminiscent of Asian design. Perhaps I could work that into the design, a Chinese pattern of some sort. Nothing over the top because I’m not so into that style but there could definitely be something interesting there.

I’ve got a couple of different silks to spin, one in hankie form and the other in roving but I’m not sure if the colors would go. Definitely something to investigate. Wouldn’t that be beautiful? It’s spinning up as a lace weight in single ply which could work in silk, although it may be better to Navajo ply it for a more substantial yarn. Because it’s variegated, Navajo plying will help keep the color progression. The only thing is that if I do that, I’m going to have to get spinning. Hummmm….

I did also think about getting a hank of that recovered silk yarn but I’m afraid that will be too heavy for what I want to do. (I looked at the yarn shop and it’s definitely too heavy and the colors didn’t go.) I thought I could also look at getting a couple of different colors of linen or hemp and doing a sort of fair isle pattern using some Chinese character charts. Here are the colors I found that I thought would go well:

You can’t see all the colors so well but it’s a sort of medium celery green and red.

This is all part of the process of exploration and I’ll be keeping my eyes open over the next little while and I’ll do some swatching with what I’ve got to see what I’m happy with.

I did have a little idea about the shape. Since I think I’m going to use the coral piece as a bar which the closure will wrap around, I don’t think I want the purse to be too large. I’m afraid if I go too large, I’ll lose the impact of the coral. But it’s also got a bit of weight so it will need to have some structure behind it.

All these are things to consider. As I swatch and make decisions, I’ll post so you can see what I’ve been trying and what works.

Wednesday, December 12, 2007

Creativity and the Elements of Design

I don’t always take a lot of time to read. Somehow I get home from work, usually tired in my brain, and pick up a knitting or crochet project to work on. Usually that refreshes me and then hooks me in so that by the time I realize I’m recharged, I’ve worked through the evening and it’s time for bed.

One of the things I always find fascinating is the subject of design. I am hugely inspired by blogs such as that of Roger von Oech, called Creative Think. He’s done books such as “A Kick in the Seat of the Pants” and “A Whack on the Side of the Head.” Now, honestly, how could you not want to read books with names like that! He also has a creativity tool called “Creative Whack Pack.” This is a whole series of creativity challenges and principles on cards, like playing cards, that you can use in a number of ways. Pick a card, any card. Use a card a day. Work through them systematically. However you want to use them, I find them thought provoking and rather fun!

On one of the cards is printed, “Get out of Your Box.” Roger goes on with a short challenge to cut across disciplinary boundaries, look into other fields in order to learn more about your own field or to gain a new perspective on issues you deal with every day. Often gaining this new perspective can open up all sorts of new doors for discovery. For me, I’ve been known to browse through stores that I wouldn’t normally be interested in, like building supply stores or a bicycle shop, for a new or cheaper way to supply my fiber craft.

For instance, my spinning wheel, a Louet S-15, had a solid rubber tube which connects the wheel shaft to the pedal. A while back it broke. There are no spinning stores anywhere near here and I couldn’t find anywhere to replace the part – I didn’t even know what it was called. The other problem was that the screw holding the tube in place was on the backside of the wheel shaft with only about an inch of space to get to it. I don’t know about you but I didn’t own a screw driver only an inch long. I kept trying to figure out what to do, trying to think as widely as possible. A trip to the local building supply store solved the problem. For one thing, I discovered that you can get a bent-head screw driver. Who knew? Now I could get to the screw to replace the part but I still didn’t have the main piece I needed. So I wandered up and down the aisles until I came to the plumbing section. Did you know that you can get thick, flexible, clear plastic tubing in a variety of sizes? I didn’t but I happened to find that one of the sizes matched my broken piece – exactly. The best part? It cost about 29 cents a foot. When I got home, the repair took me about 15 minutes and is still spinning along plus I have plenty left over for future repairs.

Roger quotes Bob Wieder saying, “Anyone can look for fashion in a boutique or history in a museum. The creative explorer looks for history in a hardware store and fashion in an airport.” The card ends with the question, “In what outside areas can you look for ideas?”

All of that to tell you about this new book I’m reading. While looking for a book in the local bookstore (which I never found), I came across one that is really absorbing me. It’s called, “Universal Principles of Design” by William Lidwell, Kritina Holden and Jill Butler (published by Rockport). The sub-title says, “100 Ways to Enhance Usability, Influence Perception, Increase Appeal, Make Better Design Decisions, and Teach through Design.” A little pompous, that title maybe, but it’s really quite a useful book. Each of the 100 design principles is arranged alphabetically for easy reference and is addressed by a brief description of the principle on the left-hand page and practical examples on the right-hand page. Although a particular design principle may be focused on a certain expression (print design or art design or software interface design), it’s fun to try to imagine how it could be translated to fiber arts. The entries are short enough to be read and thought about a little at a time, either in order or chosen randomly throughout the book. I haven’t gotten very far but was interested that one of the principles I pondered this morning while on the treadmill, I was able to apply and use this afternoon at work. Having to explain it to my co-worker helped me also clarify it in my own mind.

Some of the principles I’ve had some contact with, either through personal study or because my mother worked on a degree in Psychology while I was in school and I was her guinea pig (taking all the tests, etc.). Thanks, Mom. The book covers principles such as Cognitive Dissonance, Rule of Thirds, Archetypes, Gutenburg Diagram, 80/20 Principle, Hierarchy of Needs, Top Down Lighting Bias, Golden Ratio and Structural Forms. On each principle, the authors give the reader a number of other topics that relate to this principle for further study and even gives a listing of the principles according to whether their category:
How can I influence the way a design is perceived?
How can I help people learn from the design?
How can I enhance the usability of a design?
How can I increase the appeal of a design?
How can I make better design decisions?

A final thought in this regard. In an online Ethnic Knits group I participate in, there has been a discussion on the traditional design of Norwegian sweaters. If you’ve ever been near skiing folk, you’ve probably seen a beautiful color work Norwegian-style sweater. Traditionally, the designs are worked in black and white with a red accent color. The discussion moved into the reason for the red color, something I’ve never thought about before. Evidently, during World War II, although Norway had declared itself neutral, they were invaded by the Nazis. The resistance movement began using red ribbons pinned to the chests or lapels as a sign of their resistance movement but the Germans would tear them off. I won’t go all the way into it, but, because the Germans continually confiscated smaller items such as ribbons or hats or scarves, the resistance began incorporating red into their knitting patterns. Their design identified and concentrated the resistance and allowed the Norwegian people to make the statement they needed to make on a widespread basis. Not only did it allow them to make a statement, it was in made such a way that the design still resonates through the appeal of the mix of the colors.


I suspect the authors of this book would approve of their design.

Thursday, November 8, 2007

Inspiration can come from anywhere - literally

Last year I watched a dvd of a British tv show (called Spooks in the UK but called MI-5 in the US). I love that show. This particular episode was one where a rogue newpaper publisher was trying to derail Israeli-Palestinian talks, killing the UN’s chief negotiator who was a friend of Adam’s. At the same time, Harry’s daughter, unbeknownst to him, is making documentary films about the Palestinian situation. By the time she gets onto his radar, she’s gotten herself into a situation where they can’t tell if she’s being run as a spy by the Israeli intelligence so Harry tries to come to her rescue. Adam stops him from blowing the operation until they understand more of what’s going on.

Now I tell you all of that to say, regardless of how pretty Rupert Penry-Jones (who plays Adam) is, the thing I couldn’t take my eyes off of and what I watched over and over with the remote and the pause button with my nose to the screen was his jumper. He had on this wonderful deep green chunky sweater and I had to figure out how it was made. I was obsessed. Now understand they were filming in winter (thus the jumper) so he often had a coat covering the pretty sweater. But I finally think I figured it out and decided to make my own version of it.

Now, because this was a test version and I didn’t want to spend loads and loads on some expensive chunky wool (which wouldn’t do for me anyway), I decided to use my favorite wool in the whole world. Not actually my favorite, favorite but I do love it, not least for the fact that it still has it’s wooly lanolin fleecy smell and I love that smell. Sometimes I open my craft closet where my fleeces are stored just to dwell in the smell of the fleece. Weird, I know but I’m not bothered. Not everyone enjoys this sheepy smell as much as I do but I’m not worried about them. It’s not like I force people to smell my closet.

Ah, yes, the wool. This is Fisherman’s Wool from Lion Brand. As far as I’m concerned, it’s the best value in 100% dyable, feltable wool on the market – 465 yards for about $8. You can’t beat that with a stick. I always have a full stock of it on hand because, in addition to knitting beautifully, did I mention it dyes like a dream and felts like a charm?

But I digress. The sweater. The pretty man sweater.

So, I began my tests. After tons and tons of pausing and stepping through the scenes of the sweater (and he must have liked the sweater, too, because it was in a lot of scenes – cheers, mate) I decided it must have been a fisherman’s rib stitch (to go with the fisherman’s wool yarn – do you see something happening here?) using a chunky yarn and large needles. Since I have quite enough chunk without adding chunky wool to the mix, I decided to tone that part down a little and use the Fisherman’s Wool and size 7 needles for my gauge swatch.

You learn so much when you start playing around with things. I’ve always loved this double stitch but I can’t remember that I’ve ever made anything with it. It’s just lived in the back of my imagination waiting for the perfect project. One thing I learned from my lovely swatch is that this is an extremely stretchy-in-the-width stitch. Extremely. My normal long-tail cast on would never be able to corral this wild stitch. But I found that if I use the backwards e cast on or backwards loop or whatever you want to call it – it’s just throwing loops onto the needle with them flipped to the back – I could accommodate the stretchiness of the pattern without it going crazy. I also learned that, in order to get anything approaching an accurate gauge, the swatch needs to be stretched width-wise slightly. Did I mention the pattern is stretchy? Yes? Good.

Once I had the gauge all figured out, I got stitches on the needle and started knitting. Once you get the rhythm of the knit 1 stitch, knit in the stitch below the next stitch, it’s pretty fast until you get to the armhole shaping. Then I had to figure out a) how to work the first armhole decrease, and b) how to start the cable and bring it up the raglan sleeve. Oh, yeah, the pattern was a raglan sleeve with a pattern running up the decreases. I don’t even remember now if it was a cable but I’m thinking it was. Anyway, in my world a cable wove its way up the raglan. I decided a 6-stitch cable would be the right size to both travel up without making things too funky and big enough to stand out and be noticed.

So far so good. Now the sleeves. Of course, the only thing with the sleeves was to get the right number of stitches cast on and then figure out how many I needed there to be at the widest point. From there you just have to figure out how many increase rows you need and how you want to spread these over the body of the sleeve. If you add more decreases early, you have a more blousy sleeve. If you add them later, you get a more form fitting sleeve. I wanted somewhere in between so I sort of made it up as I went along, making the decreases fairly even up the sleeve body. The armhole shaping for the sleeves was a doddle because of the nature of the raglan. It was exactly the number of rows and frequency of decrease and the front and back pieces (minus the cable stitches) so they would fit together perfectly. Done.

I had the cable follow all the way up the raglan into a cozy, almost turtleneck collar. I continued knitting for about another 2 inches so I could fold over and hem the collar on the inside. Now, I not only have a sweater that double thick (because of the way each stitch is knitted twice) but the collar is quadruple thick (because the stitches are knitted twice and I have 2 layers of fabric). There you have a cozy, comfy pretty man sweater – for a woman. The pretty man was just the inspiration. Well, not actually the pretty man – it was actually the pretty man’s sweater. Actually I guess this sweater could be for a man with a few alterations. Not many. Just a few.

I absolutely love the finished item and wore it all the time last winter. As I was making it I did take notes and even managed to get the pattern mostly written. In fact, it’s written to the collar decreases and I’m working on the test sweater now so I can make sure everything fits together. It’s a challenge to keep track of trial and error. I don’t know about you but, with most things, I usually sort of poke around until I find something that works but I often don’t remember what I did to get there.

I’ve had to make a few corrections and, ahem, refinements to make the pattern flow and be intelligible to anyone other than me but I loved the exercise of capturing the process in a reproducible form. It’s made me much sharper in examining what I do and has helped me to think more critically about my craft. As they tell me Dobie Gillis used to say, “Good stuff, Maynard.”

I'm planning on making the pattern available to puchase on my website at http://www.wandagraysondesigns.com/ as soon as I finish the testing and get the pattern prettied up.

By the way, you’ll have to watch the episode to find out what happens to Adam and Harry and Harry’s daughter and all the others. Very exciting.

Thursday, October 25, 2007

I Love Beads

Can I just say, I love beads. I love how they feel and how they catch the light and how the fabric feels in your hands and how they look. I’m enamored with beads. No one who knows me will be surprised by this sentiment but I just felt it needed to be said. I also love the fact that, even in the hands of a novice, they make things lovely. I’ve knitted with beads and I’ve crocheted with beads and I’m learning how to tambour with beads. But this is my first foray into just plain beading for a bag like this. Well, not the absolute first. I’ve done a couple of little amulet bags but this is the first real people size beaded purse. As you can probably tell, it’s my own design – not very even but did I mention it’s my first? And I’m in love with it. Just like a first car or first house or first love, it’s special. Even if it’s a first beaded bag that only a creator could love, since that’s me I feel pretty good about it!

As with other things I make, this started out life as something else. This was the top half of a bag knitted from
Noro Silk Garden (which I still intend to finish by the way). But when I got into it, I didn’t like the proportions so decided to finish this off as I did and I’m ever so pleased with it.

Did I mention I love beads? OK. Good.