Showing posts with label tatting. Show all posts

Friday, May 1, 2015

Spring

Spring is about all things becoming new again. In the spirit of spring, last night I found this.
It's a metal box I got one Christmas that I found was generally perfect for tatting projects - long enough for crochet hook and deep enough to hold most balls of cotton and sturdy enough to protect the shuttle. 

Inside I found a tatted doily project is forgotten about. 

That's the pattern and this is how far is gotten.

Fourth round. The second round was the hardest and I don't have far to go so now it's a new project that's on my list for this weekend. Now that I've got the split rings thing down, it will go soooo much faster.

That gives me simply 3 projects for the weekend. 
1.  Tatted doily 
2.  Bobbin lace miniature flower for necklace

(Magnified view - I'm now in the second half of the 3rd flower). Working with yellow Gutermann's silk thread. So yummy, I can't even tell you.
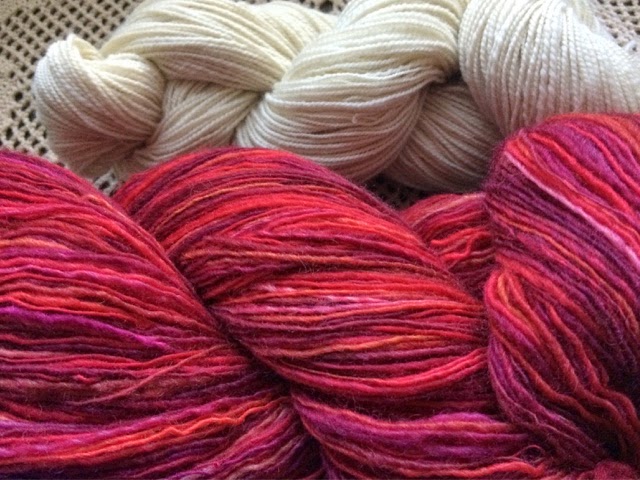
3.  First installment of Rohn Strong's mystery knitalong shawl where I'll have to make my mind up between a 2-ply merino/angora handspun in white (I have 300+ yds but will need to spin more) or a single-ply Blue Faced Leicestet spun from a gorgeous Frabjous Fibers roving in reds/oranges


Hard choice to make. I may just have to do 2 of them!


Tuesday, April 21, 2015

Braided Tatting

Yesterday on Facebook I saw photos of a couple of projects made with strands of 'split ring' tatting that just fascinated me. 

One was a bracelet made with 2 different color strands woven together. Since I'm on a mini-tatting spree I had to try it. 

First things first, though.  A refresher course on making a split ring. All that means is that instead of using a single thread and working the ring all the way around, you use 2 shuttles wound continuously and work part of the ring wi the main shuttle (making the flip like you would normally do) and then you work the other section of the ring with the second shuttle (without making the flip - in other words, the foundation thread remains the thread from the first shuttle). You also work it forming the stitches backwards. It sounds way more complicated than it really is. It's not beginner stuff but it's not that hard when you get the gist of it. 

What you end up with is something like this…
You get a cool textural effect that then becomes your palette to use size of rings and color combinations to make all sorts of cool things. I want to try this with chunky yarn to make a scarf. Wouldn't that be cool?

So I learned something new and whittled away a whole evening all at the same time!  

Wednesday, March 11, 2015

Tatting experiments

I will be teaching a tatted jewelry class in June at the Lacemakers and Collectors Exchange (LACE) Lace Day in Chicago on June 13th. I'm still working on designs but this is the sort of project we'll be working on. 
It's not terribly complicated but the pendant is supported by a heavier thread base paired with a light jewelry wire to give it some strength. More info on the  day at http://www.lacemakersofillinois.org. 

If you don't know how to tat but would like to take this class, not to worry because I will be teaching a beginner tatting workshop in May at Hopewell Weaving in Chillicothe, IL (near Peoria). More info on this class at their website:  http://www.hopewellcreations.com. 


Wednesday, November 12, 2014

Finishing

Can I just say a few words about finishing?

How a project is finished, of course, depends on whether the project is knitted, crocheted, tatted, etc. Crochet? Easy peasy. Knitting? Even with color work pieces, I don't mind. I even kind of enjoy that process. Tatted?  Ahhhh, this is another story and a big reason I need to learn a new technique. When working in a larger piece (in this case a doily for a friend at work), at the end if each round you have to work in the finishing threads. Into tight knots. Each one. Seperately. Every one. Tight. Knots. 


I finished the work but not the doily. It's kind of like winning the battle but not the war. The challenge is to get a needle with an eye large enough for your thread (DMC size 30) that will fit through the aforementioned knots. 

Now some people would stop and work them in as they go. But not me.  Nooooooo....I leave them to the end, me. Now I have this beautiful doily that can't be called finished until I sit for the better part of an evening working in ends. 

There is a technique used in bobbin lace where you can work in a loop that will allow you to easily pull the ends through when you're finished. That's next because however annoying the set up is, there's no way it beats this. 

But I'm happy with the finished doily and the finished crocheted doily that just needs a good press, both for ladies at work who asked for them. 


Sunday, July 7, 2013

And tatting again

I just can't stop.  After finishing the last doily, I dove into my Workbasket stash and came across a quintessential tatting doily pattern in the October 1967 issue.  Here's the start of it along with another project I'm working on with the bobbin lace.

Friday, July 5, 2013

It's been quite a journey

I'm FINALLY finished with this doily.  It took me 4 full days just to get around the next to last round.  But it's completely worth it, don't you think?
I don't know where I'll use it but I'm thrilled at how it came out.  I can't wait to start a new project.  The thread I used was Aunt Lydia's Crochet Thread in Extra Fine size 30.  It's the first time I've used it and it worked great for tatting.  Not all crochet thread is great for tatting because it's not always plied tightly enough but this worked great.  It's a nice size and feels great.
 
On the big next to last round, it took 4 full bobbins to get all the way around.  The easiest thing to do was to wind the bobbins from a second ball and keep the first ball attached.  That way I only had the one end to work in as I went.  This is definitely the largest tatting project I've ever attempted.  Now I'm going to my Work Basket magazines for another!

Sunday, June 30, 2013

5th times the charm...apparently

Tatting is beautiful.  I love tatting.  I love to look at tatting.  Tatting is pretty hard - at least when you're distracted while you're tatting.  At least when you're me and you're distracted while you're tatting.

I took on this beautiful oval tatted doily from The DMC Book of Charted Tatting Designs.  Absolutely nothing wrong with the instructions, clear as a bell.  Nothing wrong with the photo accompanying said instructions.  Ditto.  But with the round I just finished, I've had re-start it 3 times, cut out about 4 repeats, redo rings 3-6 times.  I finally thought I'd finished the round last night when my spidey senses warned me to lay it out and double check before I close up that last ring and finish.  Here's what I saw on the last repeat of this brutal round:
On the last repeat of the round, I discovered that I'd attached the ring to the wrong place.  Fortunately, I had not closed the ring so, once again, I took the stitches out, poked myself with the sharp end of the tatting shuttle twice and fixed it.  Now it looks like this:
Very satisfying.

Until I look at the pattern.  I have to finish this easy round and do one more round like this, simple ring/chain.  Then I have another round of the killer pattern.  The previous round had 20 repeats, the next one has 40 repeats.  I may be here yet awhile.

Saturday, June 22, 2013

At the auction

While I'm sitting at a day-long auction at Patricia Doyle's Auctions, I have had to entertain myself through the stuff I don't care about so here's what I've been doing:

This is going to end up being quite a large oval doily since I'm using size 10 crochet cotton.  I've worked my shuttle thread out and they've gotten to the furniture I'm interested in so I've set it aside but I think it's going to be beautiful.

I did find a cool bed this morning at an antique show being hosted by a local historic farm home.  It's a wooden spiral frame, in great shape at a great price.  I haven't gotten it, though, because it measures 51 inches wide so it's between the 3/4 and the full bed shape.  It wouldn't matter but it has side rails so I'll really need to get a mat-tress that will fit or some way to jigger something.  But the seller is in the area so I'll be able to follow up with him.  I wish I'd thought to get a photo of it but I was too busy sweating and hoping not to have to use the PortaPottie!

Here's the piece I wish I had room for:
Not a great photo but it's a magnificent burled walnut bed with 8 accompanying pieces.  So grand!  It will be interesting to see if it even sells.  Everything so far is selling way beyond what I'm willing to do but it's kind of fun to see how things go.  So far the most expensive thing of the day has been a paintin sold for $7,000!


Monday, September 3, 2012

Variations on a theme

I had certain things I wanted to accomplish this long holiday weekend. The biggest goal, finishing the warping of the loom, I didn't do. Demo-ing at the Historic Marbold Farm Ice Cream Social, I did. Tatting, I really did. I decided to do some samples of a project I'm going to do for a class. I thought it had a lot of scope for variations so I tried a few.
At the top was the original sample in a plain single color.  It has 4 simple, small motifs in the middle with an edging around.  I decided to play with more small motifs in the middle with the edging.  I found this variegated green so I thought maybe I could play with a garden theme.  I did the 2 motifs in the pinks.  I didn't have a plan, I just started making motifs and putting them together.  Once I'd come up with this configuration, I wished I'd planned it better and done the 4 middle motifs in the colors and surrounded them with the green motifs.  But I didn't and I couldn't cut the 2 green ones out of the middle because they were foundationals motifs and had others motifs connected to their picots.  So I went ahead and finished the edging on it.  Pretty but I think I'd like to do it again with the pinks in the middle and the greens surrounding.

I did another small version with just the variegated pinks.  With these last 2 versions, I did the tips in a different method than I did on the pink version.  This is the pattern that I didn't like the way the book had done the end so I've been playing with other combinations.  I think I like this version the best.  On the end, where I'm working between 2 picots on the same motif, I did 6 ds, small picot, 1 ds, large picot, 1ds, small picot, 6 ds.  This give a nice pointy end for the diamond.

Monday, August 13, 2012

On to the land of tatting

I've gone from babyland to the land of tatting, all with the little exercise of the making the samples for the LACE group.  I admit there had been a hankering for the tatting for a while but this got me going.

After I finished the samples, I was looking through one of the books I'd been using and came across a pattern that was just like the one I'd found in the 1933 craft magazine (click here for more info on that one).  I'm so fascinated by this technique of tatting a pattern with an open middle and then needle weaving a pattern in the opening.  The pattern I just found is in a Dover publication but the original publication of the pattern was probably in this same time frame - early 1930's.  See what you think.

First you tat the "frame."
These are 4 identical motifs that were joined as I worked.  The way the pattern was written made the final join in the motif extremely challenging but I found that by changing the starting point from the ring in the middle of the side to the 4-ring motif in the corner, it solved the challenge and made it easy as pie.  It's easier and I'm allowed to do that. Working the following 3 motifs, getting the joins in the right place however, entailed the challenge of paying attention to where I was at all time and making consciously sure I was joining to the right picot (see previous post about "ripping out" tatting - not fun).  Of course, I had to test my powers of tatting by doing all this by watching the movie Inception.  I love that movie but I don't recommend tatting something complex while watching it.  That is, unless you've seen it more than 10 times. 

Now that I have the framework in place, I can work the inner weaving patterns.
Like this.  Isn't that interesting?  Click on the photo for a closer look.

I've got it pinned to one of my bobbin lace pillows to make sure it doesn't get skewed in the weaving.  I also steam ironed it before I started.  The helps set everything in place.  Tatting's pretty solid but it just adds a bit of structure as the weaving is worked.

The needle weaving is very relaxing and contemplative.

I've been wondering how this could be worked with knitting (not sure how that would hold up) and crochet (I think crochet could totally work).  I even thought about the possibility of working this in a sweater or other garment.  You could certain even work the tatting and use it as a centerpiece in a knitted garment.  How about doing it in a circle and using it as the yoke of a sweater?  That could be very, very cool.

By the way, for those that care, I'm working this using Lizbet size 20 Egyptian cotton in Mocha Brown Medium.  It's a 6-cord cardonnet thread which is more tightly spun than regular crochet thread and more suited to tatting.  You can use crochet thread but it doesn't hold up as well or have as much body for tatting.

Monday, August 6, 2012

Thoughts and conclusions

I've been learning a few things lately and I've come to a few conclusions. 

I've come to the conclusion that ripping out is easier with crochet and knitting than it is with tatting.

I was asked by the LACE group in Chicago to do a tatting class during their  Lace Days event next June.  Since they want to approve the pattern (or choose the pattern - not sure what that's about), I've been doing some samples for them to look at. 

One of the patterns, the one on the left here, is made up of 4 small medallions, put together with a border stitched around them.  I got the inner mediallions done, no problem.  I started working the outside border and started to have issues.  There weren't nearly enough stitches to make it lay flat and the original pattern had the double rings off to the side on the top and bottom (where here I've added the longer chains and little upsidedown ring).  Again, no problem, it didn't take long to do.  I'll rip it out and redo the border, adding more stitches.

Now crochet is the easiest thing ever to rip out because you're only ever working with one live stitch at a time.  Knitting's not too bad either unless you're on a complex lace pattern.  But even then, you've put in life lines and you're okay or you can take it out stitch by stitch.  Not so bad, even if time consuming.

With tatting there's none of that.  Here's what ripping out looks like in tatting...
It's done with scissors.  You just snip it right off and start all over again.  And then you redo the border.  Easy.  But it sucks when you've made a mistake in the middle of a pattern.  Once you've closed a ring, the ring is closed and there's no way to change it.  Other than cut it off.

The next thing I've been thinking about is the new exercise routine I've started with a program called TurboFire.  I've been thinking a lot about how I feel and how I feel about myself and I came to the conclusion that I don't care about the weight, I care about not being in shape.  I needed a kick in the butt and preferred to try this method rather than the personal trainer route.

My goal is no longer to lose x number of pounds, it's now about fitness.  My goal right now is to be able to do 25 full plank push ups.  When I started 3 1/2 weeks ago, I could barely do 2 half pushups on my knees.  Now I can do about 10 full pushups on my knees and 3 plank half pushups. There's something about that change of focus that is motivating me to do the work and being able to feel and see the muscles starting to take shape makes me want to do more.

I don't want to sound like an infomercial but here's what I like about this program.  Although it is a fnancial investment, it's a fully rounded program that provides both cardio, strength and flexibility training.  It comes with the "props" you use in the workouts like a lower body band, a toning band, a workout schedule for just starting out and for long term use, help with learning to use food to fuel your body instead of defeating the purpose (and a killer recipe book) and about 15 different videos with different types of workouts.

Now here's another conclusion that I think I always knew but has been reinforced to me.  People with passion for what they do make the best teachers.  I think that's one of the big things I've responded to in the way the Chalene Johnson approaches these workouts.  There's a lot of butt kicking but you get so encouraged by her enthusiasm and passion that you don't even noticed you got your butt kicked until it's over!  Well, you might have a clue or two but you want to press through.  The vibe is so positive that you believe you can do it, even when you're panting and your legs are shaking. 

There's always the understanding that you do as much as you can and then next time you do a little more than you did today and so on.  It's not for everyone but it will take you on a great journey and you'll feel like you've really accomplished something.  Music out.....

And my final influence lately is a children's book called the Phantom Tollbooth.  Somehow I got through childhood and this far into life without coming across this book.  I'd heard an interview with the author, Norton Juster, because they've just put out the 50th anniversay edition of the book, and was intrigued by the interviewer's extensive quoting of the word play throughout the story.  Sounded like just my kind of thing.  It's been quite a journey with Milo and Tock and the Humbug.  So my thought here is that we underestimate kids.  We underestimate people that we know in just one context, only at work, say, or who are older.  We don't hold out the possibility that they have interesting interests or talents or have had interesting experiences.  Understand?  No?  Read the book.

Monday, May 16, 2011

This time for sure

I tried several times during the week to post but blogger was down for a couple of days and I'm still having trouble uploading photos.  Hopefully this will work.

I just got back from Chicago where I was doing a tatting class for some of the folks from the LACE group.  There's going to be a beaded tatting class at the Lace Days on June 18 (actually this class is going to be the day before - see info posted on the above link) and some of the folks wanted to get in a lesson on tatting before they got to this more advance class.  There were also a couple of sisters who joined us, one of whom I met at TLD Designs where she was teaching an enameling class.  They were all the biggest hoots.  We laughed all day long.  And the best part is that every single one of them tatted.

It's not all going to be comfortable the first day you learn something new like this but they did fabulously!  Practice makes it more comfortable.  I love it when you get a room full of people who are willing to try just about anything. 

Our hostess, Nancy, was definitely the hostess with the mostest and I deeply appreciated her offer to put me up on Friday night so I didn't have to drive up and back in one day.   Thanks, Nancy.  You're the best!

Before we got started, we got entertained by an acrobatic squirrel:

In case you can't see, he's got his back leg hooked over one of the stands for the birds.  He was in high cotton, you can bet.
The table was set up ready for the gang:

We were moving too fast to get actual class in action photo (for some reason, I never think about taking photos while I'm running around the table!).  But we did get this one photo before everyone headed off:

I can't even tell you how much we laughed.  That's definitely the way to have a class!!!

Next up, the last event in my busy, busy spring, is the Kentucky Sheep and Fiber Festival in Lexington, KY.  This is a new event with this being, I believe, only the second annual.  If you're anywhere near, you definitely want to come out.  There are a ton of vendors, demonstrations and classes all day Friday and into Saturday morning.  I'm doing a Spin for Lace class on Saturday morning and there are only a few places left. I'd love to see you there!

Monday, February 21, 2011

Too Much

There's just so much going on that it's a bit overwhelming.  First of all, I visited (and joined) the Lacemakers and Collectors Exchange (L.A.C.E.) on Saturday in Clarendon Hills (near Chicago).  It was a lovely group of folks and I learned more in that afternoon than I've learned to this point, I think.  The program was an excellent overview of how to read the prickings (patterns), how to choose thread and pins and bobbins.  Although one person was doing the main part of the program, others were jumping in with their preferences and other tips and points.  It was so helpful to hear their thoughts since I'm so new to the discipline. 

The lady who was giving the program had a nifty little travel set so I thought the inevitable thought that takes up all your time over the next weeks that you think the thought:  "I could do that."

So here is my version. 

It's not finished yet but I'm really digging the way it's coming out.  I still need to sew up the pin cushion in the top (which will go into the bottom of the box for storage once it's all finished).  I also need to finish the "skirt" where the bobbins will rest as I'm working.  But I think it's going to work, I really do.

While I was up there, I decided to make a weekend of it but you'll have to wait until next week to hear the big news.

But I can show you what I found on the way home.  This was at a lovely antique shop called 2nd Time Around Antiques:

Tatted doilies.  You hardly ever find proper tatted doilies.  After I got them home, I realized that 2 of them are a smaller and larger version of the same pattern.  I've got this one written out and I'm making my own version of it.

Fab, no?

Thursday, October 28, 2010

Somebody Stop Me, Please....

I think I've gone just the smallest bit mad with this whole tatting thing.  Honestly, ya'll, I can't stop.  You want to know how bad it is? (How bad is it??????)

I was going through my pre-1930 craft magazines looking out tatting patterns for a challenge in the latest Piecework Magazine and I came across a 1925 issue of Needlecraft magazine that featured a tatted bedspread using size 8 cotton.  That's thread.  Not teeny tiny but small enough.

The instructions say that "When finished, the spread contains one hundred and twenty squares, each about nine inches."  Did you get that.  120 squares.


I realized how crazy I'd become when I looked up from the pattern with the realization that I had actually been considering making it.

Monday, September 20, 2010

One, Two, Three

I was going to share some projects with you yesterday, until the electricity went out for 2 hours. Of course, that may have just been a good excuse!  I'm good at that, excuses.

So, here we go.

First of all, like many other knitters, I almost always have a pair of socks in tow.  When we went to Santa Fe, I pulled out a bright, cheery sock yarn - a self-striping ball of sunshine to work on during the trip.  The first sock went very quickly, indeed, as I wandered through the Georgia O'Keefe Museum and knitting.  The second sock came more slowly but I've finally got them finished.  (edited for yarn brand) It's Red Heart Heart and Sole  sock yarn.  It's one of those that's imbued with aloe.  I can't tell a difference but I'm sure it's there.  It didn't necessasrily feel all that soft when I was knitting it but now that it's been washed it, really softened up and makes a very comfortable sock indeed.  See if this doesn't look Santa Fe to you.


While on our trip, we had a side trip up north.  We were headed through Espanola with Gladys, the Navigation lady telling us, 300 feet, turn right (I heard a lot of recalculating, recalculating while I was driving).  We were quietly driving through town when I looked to my right and saw a door marked with "Espanola Valley Fiber Arts Center."  I think I surprised my mother when I yelled out, "Fiber!" and whipped into a parking lot next door.  She took it in her stride, though, knowing me as she does.  What a wonderful place!   Along with a beautiful Navajo spindle and a drop spindle, I found some Frabjous Fiber blue-faced leicester in the most intense greens and blues.  If you've followed this blog at all, you'll know how much I love this fiber and how much I love the colorways of this company.  Truly Frabjous.

Blue-faced leicester is one of those yarns that is soft, long-stapled, has a sheen and takes dyes amazingly.  It really almost spins itself and, I think it's the very best yarn to learn to spin finer yarns with.  It's definitely the first thing I would recommend using. This 4 ounces of scrumptiousness was spun "s" singles and "z" plied with 2 plies and it came out to probably fingering weight.  I split the roving into 2 sections, spinning one of each of two bobbins so that it could be easily plied.  The colors were so intense that I had just couldn't get enough of spinning it.  However, as often happens, the color characteristics were somewhat lost in the plying.  Instead of these nice strong colors, I felt it was muddied a little bit.  Now, if previous experience has taught me anything, it's taught me that when it's knitted up, all of those colors are likely to come to the fore again.

The final project to show you for you now is a tatted baby bonnet from a 1925 Needleworks magazine:

I can't tell you what a kick I'm getting out of this.  The pattern has been very easy to follow - so far, so good.  In fact, I keep thinking that I'm going to be breezing along, thinking there's nothing to this tatting lark, when the universe is going to knock me down a peg.  Careful does it.

While I'm thoroughly enjoying this, it also makes me really miss my Grannie.  She thought tatting was so pretty but never learned to do it.  She would be thrilled with this.  So, here's to Gran...

Sunday, April 25, 2010

More, more, more

I've been doing more socks, more crochet doilies and more tatting.

I actually haven't been doing too much because work has been so intense lately.  By the time I get home, I literally have no energy to do anything but stare at the wall and crochet.  So I've done a lot of crochet.  I've now completed 8 crochet doilies in the last 3 weeks.  It's been so therapeutic.  Before they go, I'll try to get a photo of the whole line-up.

Saturday I got the newest issue of PieceWork magazine and was so thrilled to see a lace issue.  There was knitted lace and bobbin lace and, yes, tatted lace. 


I just had to try it out.


Sweet.

I messed up on part of it but now that I understand how the pattern works, I'm going to cut it and start fresh.  I've never seen anything like this, I think it has such an Audrey Hepburn sort of look to it.  Maybe that's just the black and white thing but I do like it.

I meant to post about this earlier - just refer to previous discussion about work - but I wanted to show you the finished product. 

Monday, April 19, 2010

Doily Land

I had someone ask me to make some crocheted doilies and, you know, it was exactly what I was wanting to do.  You know I love to knit. And I love to spin. But every once in a while I just have to crochet.


And one tatted doily for good measure!

Tuesday, April 13, 2010

Time to tat

You know I'm going to be talking tatting for a while, right?  Whoever thought it would be so much fun?

Variegated bedspread weight edging:


White, size 30 thread, doily:


I really wish my Grannie could see this.  She'd love it!

Sunday, April 11, 2010

Look Ma, I'm Tatting!

The 2 crafts I always wanted to learn but which seemed out of my grasp were spinning and tatting.  Tatting patterns are so often included with crochet patterns and all my life I've seen them, thought they were so pretty but, as they say, a lost art.  I've tried over and over to learn to tat from book instructions but I don't do so well from books.  Let me see done and I can do it but books - not so much.  My mother is great at picking over a book until she understands and can do it.  I'm not that smart.

Several years ago, I got to check that spinning box (although I would only just now really feel like I could justifiably say I was a spinner) but the tatting eluded me.  Until yesterday.  It all started one afternoon a few weeks ago when I was at my Mom's in North Texas.  I went over to the local JoAnn's Fabrics and found a tatting book with a dvd included.  Score.  But I've been so busy since I've been home that I hadn't had a chance to look at it.  Friday night I pulled it out and started watching the dvd and it just all made sense.  In the first 45 seconds, all of a sudden, in a flash it all made sense. 

But it was late and since I never stay up late (cough, cough), I put it away and picked it back up yesterday.  And it still made sense.  The book is "Learn to Tat" by Janette Baker.  It says this is her first book and, if that's so, she done good.

I've since been practicing and am feeling almost comfortable with it now and am beginning to pick up some speed.  That's one of the things about the video that I really liked - she shows everything very, very clearly but then she makes the stitches at speed.  That helped me understand what she was doing when she wasn't thinking about it and showed me how to make the stitches come together.  If you've ever wanted to learn to tat, you should get this book.  It's published by American School of Needlework and I saw it yesterday at the local Hobby Lobby so you should be able to find it most places now.

If you don't look too closely, it looks like the real thing!

So, the score is:

Spinning - check
Tatting - check

Ha!