Tuesday, May 6, 2014

Following the crowd

Ten minutes after I finished my doily, I got started on my next project. The LACE group in Chicago is doing a group competition which entails each person using the same pattern of an outline of an elephant. We can do it using any technique and the filling can be any type of pattern we want. This is the first time I've done anything like this so I'm looking forward to the challenge. 

Here's how I started:
I'm doing a basic tape technique for the outline but I'm using 3 shades of silk thread because I thought that might be interesting. Not sure how the corners will look but I won't know that until I take it off the pillow. 

I'm now finished with the outline. Just need to tie off and start working on the filling. But that's a secret!

The other thing I've been working on is a baby blanket for a friend at work. I had a little panic over the weekend after I washed it because I wasn't sure if it would be big enough. I called a friend who does a ton of baby blankets and she talked me off the "I've got to start over and the baby is due any day now" ledge by saying she thought it would be perfect for a car seat. 

I'm hoping that's true because it's done and handed over to Mommie to be. She seemed happy so I'm going to roll with that. 
I did the classic Feather and Fan pattern and then finished it off with a crocheted edging. Very pretty and very classic. Welcome Baby Girl Scott!!

Monday, April 28, 2014

TaDaaaaa

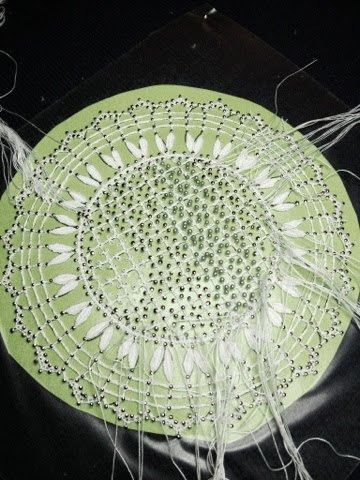
My eyes are crossing and my fingers are sore but I was able to complete my doily. I don't know why but I find it hard to leave something almost done. 

I can't put a book down if I've only got a chapter to go even if it's one o'clock in the morning. I can't leave a sock undone if I've just got half the foot done. And I can't leave a pattern done if I've just got a little bit to go. 
I'm driven to finish. So this morning I got it all worked and all I had left was tying things off. 
But you'll notice that it's not just about tying off. After you do the tying off, then you've got to remove the bajillion pins that were used over the course of the project. How long should that take?  

In this instance it took about 1 1/2 hours and that was with a pin puller. But when you're done, you end up with this. 
If one were to look very closely, one would see some (4) main mistakes, 3 where thread got caught on a pin and left an unintentional loop and one where I missed a pin on the outside edging. That one was in the section where I was demoing and talking to people. 

But regardless, I'm very pleased with it and will display it proudly. Now to decide how to display it. It would be pretty on a pillow or I could frame it.  Hmmmm.... I'll have to think about this. 

Saturday, April 26, 2014

Finally

I'm very excited to share that I have just had an article published in the new lace issue of Piecework. The article is about a bobbin lace pattern I found in an early 1900's issue of the Modern Priscilla magazine. 


Falling for Bobbin Lace by Dianna Smith. 

They shortened the article and ended up not being able to include the project but I was very pleased at how it came out. I will be putting the beginning project here very shortly and will make the MP project available as well on my website. Keep a look out for those coming soon. 

Thursday, April 24, 2014

Closing In

There has been a lot going on this past week including late nights at work, a little bit of time off work spent in the yard cleaning things up and getting some stuff planted.  Going back into the yard to critter-proof the new platings and working more in the yard, etc. you get the picture. 

But in the midst of all that I've been working on my doily. 
Just 2 1/2 repeats to go to finish the outside. I've had a lot of people ask and those are pins, not beads. Once I'm done, all of those will be removed. They're used to help shape the lace and keep it in place until it's done. 

This has been a fun project for a number of reasons. First because it's not too hard but I've gotten a ton of practice on making leaf tallies and plaits. 

Second, because it think the construction is interesting. The pattern had a little bit of instruction but not everything was spelled out. I like that. It makes me have to think about what I'm doing and why. That challenges my bobbin lace skills. 

Third,I'm going to get more than enough practice making picots when I do the center. 

Finally, I think it will be a nice piece when it's finished and I know just where I'm going to put it. 

Sunday, April 13, 2014

Close Encounter of the Weird Kind

A couple of weeks ago we got a message that someone was putting on a "FolkFest" and a "ScareFest" at the Prairie Capital Convention Center.  Weird combination, right?  As things winkled out, a "major cable network" with a "reputable reputation" was filming a reality series pilot to be centered around convention centers.  They threw these 2 events together in a short amount of time and invited folk art vendors to come and sell during the event.  It was free for vendors and free for the public and everyone got what they paid for.  But we had fun trying to speculate what the "reality" portion of the show was.

I said that I would come on Saturday for the 2:30-6:30 time slot to demonstrate bobbin lace and spinning cotton from seed.  I wasn't sure how many kids would be there and that's a real crowd pleaser for kids.  Come to find out, there weren't that many kids and there weren't that many adults other than the ones dressed in weird costumes or covered with fake blood and guts.  It was a nice crowd but it was a little odd to see these folks learning to square dance with square dancers dressed in their square dance finest.

But as weird as it was, getting to meet the other vendors was a nice little perk and I got to demonstrate bobbin lace to people who'd never seen it or heard of it.  In fact, of everyone (except my friends who hear about it all the time), there was only 1 lady who knew what it was.  She had just come from a trip to the Netherlands where she'd seen bobbin lace and bought a starter kit.  Unfortunately she lives quite a way from Springfield but I told her I'd help her get started.

In order to have something on the pillow that I thought I could work and still talk to people, I started a doily.
I know I'm probably supposed to work the center at the same time as the edging but the book seemed to indicate doing them separately and I wanted people to be able to see what I was doing.  The leaves are a little bit here and there because I was talking through most of them but I'm having a lot of fun with this one.  I'm certainly getting a lot of practice doing the leaves and plaits. 

I started it last Thursday night and have been able to get about a third of the way around.  That's what happens when you get to sit for 4 hours and work away, right?!

Oh, and if you can get hold of the next issue of PieceWork Magazine, there will be a short article from yours truly on bobbin lace.  I had a much larger article and project accepted but they decided they'd run out of space and so they cut down the article and cut out the project.  Once I get everything back, however, I'll put the project together and get it online.

Tuesday, April 1, 2014

In with the Beds


I love bobbin lace.  It amuses me.  It fascinates me.  It intrigues me.  But I’ve never had a proper lesson.

So when I got a chance to take a workshop with Holly van Sciver (www.vansciverbobbinlace.com) through the Lafayette, IN lace guild, I had to jump at it.  There are so many types of bobbin lace and so many options to study for the weekend.  Bedfordshire and Russian Tape lace are the styles that I’ve gotten most interested in, mostly because of the ability to use them for pictorial representations, rather than just a repeated pattern for a lace edging.  So I decided to focus on Bedfordshire lace, so named for the region of England where it was developed and refined.  I won’t go into the whole history right now but I wanted to show what I learned over the weekend.

Although I started on pattern 4 of the 4 patterns (when I was really supposed to start with pattern 1 – who knew?), it was both a learning project and an encouragement that I was able to the finish it.

What did I learn? 

I learned that Beds lace is made up of trails (the flat, solid sections), plaits (the threads moving among the other elements – I never made a proper plait until this weekend but I think I’ve got it down now), picots (another element that I never could figure out how to work properly until Holly was able to beat it into my head) and tally leaves (ditto). 

From the inside out, you see tally leaves, trail, plaits and picots, and trail.

I’m so excited I can hardly stand it.  And, by the way, another Beds project is going on my pillow just as quickly as I can set it up.  Which one is next….

Saturday, March 1, 2014

Mad Scientist at Work

Last week at knit group, several people were working on thrummed mittens which were so amazing.  If you’ve never encountered this technique, it involves knitting in tufts of roving.  We started talking about the other things you could make using this technique, like a lap blanket or slippers.

Two days later I got an email from a local yarn shop that featured a pattern for thrummed slippers.  The slippers themselves didn’t look hard, in fact they looked a lot like a vintage pattern I’ve been carrying around with me almost since I first learned to knit.  I’d never made them but the pattern was paired with a pair of gloves that are knitted flat, which was why I kept the pattern.  One of my knitting buddies said it looks exactly like the slippers she learned to make back in the day in 4H.

It wouldn’t be any big deal to incorporate the thrums into this pattern.  To try it out, I used the left over handspun from my poncho, Border Leicester fleece locks, and some roving.

The first thing to do was to try out the pattern so I could figure out how it works.  It turned out to be super easy.  Here are the basics:

The one on the left is inside out and the one on the right shows the roving
in the space between the slipper and the second sole
.
 
(I used worsted weight yarn and US size 6 needles.)

Cast on 43 stitches.

Row 1 – K4, P1, K33, P1, K4.  (The outside edges end up folding down around your ankles.  If you want them to come up further on your feet, you simply increase the number of stitches between the purls.  But keep track because you’ll need to center the “sole” stitches on the next row.)

Row 2 – K16, P1, K9, P1, K16

Repeat these 2 rows until piece measure 3 ½ inches from the beginning.

Next row: Bind off 6 stitches, K31, P1, K4.

Next row: Bind of 6 stitches, K9, P1, K9, P1, K10

Next row, work in K1, P1 ribbing over 10 stitches, K11, work in P1, K1 ribbing to the end

Next row, work in K1, P1 ribbing over 10 stitches, P1, K9, P1, work remainder of stitches in rib pattern.

Repeat these 2 rows until it measures the length of the foot but don’t bind off.  Cut the yarn leaving a 14-inch tail.  Using a tapestry needle, run the yarn through the live stitches and pull the yarn through all the stitches and pull tight.  Work in the yarn.

So I discovered that the section between the K9 of the original 2nd row was the bottom of the foot.  That’s where I needed to include the thrums.  I guess you could add them to the entire inside but the wool locks I was going to use for the thrums are quite long stapled and would wrap up around the sides.

On the first slipper I made, I interspersed the thrums 3 across the 9 stitch area and then staggered 2 across 4 rows later.  But I thought it needed a little more fullness so on the second one, I put 3 thrums across on each row.

I also changed the way I closed up the back seam.  The instructions say to sew the edges and then draw the 9 stitches of the bottom together.  On the second pair, I picked up 9 stitches along the back and knit a triangle inset to make the heel a little squarer.  Gathering the stitches made a bump in the back that wasn’t very comfortable.

I finished them and really liked where they were headed but, since today is the perfect day to try out warmy, cozy slippers, I realized they needed a little more on the bottom.

So I pulled out the chunky handspun from my leftovers and knitted an attachable sole.  To add to the cush and the warmth, I decided I would also pack the pocket between the new sole and the bottom of the slipper with wool roving.  Ain’t no cold getting’ near my tootsies with these suckers!