A couple of weeks ago we got a message that someone was putting on a "FolkFest" and a "ScareFest" at the Prairie Capital Convention Center. Weird combination, right? As things winkled out, a "major cable network" with a "reputable reputation" was filming a reality series pilot to be centered around convention centers. They threw these 2 events together in a short amount of time and invited folk art vendors to come and sell during the event. It was free for vendors and free for the public and everyone got what they paid for. But we had fun trying to speculate what the "reality" portion of the show was.
I said that I would come on Saturday for the 2:30-6:30 time slot to demonstrate bobbin lace and spinning cotton from seed. I wasn't sure how many kids would be there and that's a real crowd pleaser for kids. Come to find out, there weren't that many kids and there weren't that many adults other than the ones dressed in weird costumes or covered with fake blood and guts. It was a nice crowd but it was a little odd to see these folks learning to square dance with square dancers dressed in their square dance finest.
But as weird as it was, getting to meet the other vendors was a nice little perk and I got to demonstrate bobbin lace to people who'd never seen it or heard of it. In fact, of everyone (except my friends who hear about it all the time), there was only 1 lady who knew what it was. She had just come from a trip to the Netherlands where she'd seen bobbin lace and bought a starter kit. Unfortunately she lives quite a way from Springfield but I told her I'd help her get started.
In order to have something on the pillow that I thought I could work and still talk to people, I started a doily.
I know I'm probably supposed to work the center at the same time as the edging but the book seemed to indicate doing them separately and I wanted people to be able to see what I was doing. The leaves are a little bit here and there because I was talking through most of them but I'm having a lot of fun with this one. I'm certainly getting a lot of practice doing the leaves and plaits.
I started it last Thursday night and have been able to get about a third of the way around. That's what happens when you get to sit for 4 hours and work away, right?!
Oh, and if you can get hold of the next issue of PieceWork Magazine, there will be a short article from yours truly on bobbin lace. I had a much larger article and project accepted but they decided they'd run out of space and so they cut down the article and cut out the project. Once I get everything back, however, I'll put the project together and get it online.
Knitting and more...spinning, beading, crochet, tatting, bobbin lace, tambour, watercolor....
Sunday, April 13, 2014
Close Encounter of the Weird Kind
Tuesday, April 1, 2014
In with the Beds
I love bobbin lace.
It amuses me. It fascinates
me. It intrigues me. But I’ve never had a proper lesson.
So when I got a chance to take a workshop with Holly van
Sciver (www.vansciverbobbinlace.com)
through the Lafayette, IN lace guild, I had to jump at it.
There are so many types of bobbin lace and so many options to study for
the weekend. Bedfordshire and Russian
Tape lace are the styles that I’ve gotten most interested in, mostly because of
the ability to use them for pictorial representations, rather than just a
repeated pattern for a lace edging. So I
decided to focus on Bedfordshire lace, so named for the region of England where
it was developed and refined. I won’t go
into the whole history right now but I wanted to show what I learned over the
weekend.
Although I started on pattern 4 of the 4 patterns (when I
was really supposed to start with pattern 1 – who knew?), it was both a
learning project and an encouragement that I was able to the finish it.
What did I learn?
I learned that Beds lace is made up of trails (the flat,
solid sections), plaits (the threads moving among the other elements – I never
made a proper plait until this weekend but I think I’ve got it down now),
picots (another element that I never could figure out how to work properly
until Holly was able to beat it into my head) and tally leaves (ditto).
From the inside out, you see tally leaves, trail, plaits and
picots, and trail.
Saturday, March 1, 2014
Mad Scientist at Work
Last week at knit group, several people were working on
thrummed mittens which were so amazing. If
you’ve never encountered this technique, it involves knitting in tufts of roving.
We started talking about the other
things you could make using this technique, like a lap blanket or slippers.
Two days later I got an email from a local yarn shop that
featured a pattern for thrummed slippers.
The slippers themselves didn’t look hard, in fact they looked a lot like
a vintage pattern I’ve been carrying around with me almost since I first
learned to knit. I’d never made them but
the pattern was paired with a pair of gloves that are knitted flat, which was
why I kept the pattern. One of my
knitting buddies said it looks exactly like the slippers she learned to make
back in the day in 4H.
It wouldn’t be any big deal to incorporate the thrums into
this pattern. To try it out, I used the
left over handspun from my poncho, Border Leicester fleece locks, and some
roving.
The first thing to do was to try out the pattern so I could
figure out how it works. It turned out
to be super easy. Here are the basics:
The one on the left is inside out and the one on the right shows the roving
in the space between the slipper and the second sole.
(I used worsted weight yarn and US size 6 needles.)
Cast on 43 stitches.
Row 1 – K4, P1, K33, P1, K4.
(The outside edges end up folding down around your ankles. If you want them to come up further on your
feet, you simply increase the number of stitches between the purls. But keep track because you’ll need to center
the “sole” stitches on the next row.)
Row 2 – K16, P1, K9, P1, K16
Repeat these 2 rows until piece measure 3 ½ inches from the
beginning.
Next row: Bind off 6 stitches, K31, P1, K4.
Next row: Bind of 6 stitches, K9, P1, K9, P1, K10
Next row, work in K1, P1 ribbing over 10 stitches, K11, work
in P1, K1 ribbing to the end
Next row, work in K1, P1 ribbing over 10 stitches, P1, K9,
P1, work remainder of stitches in rib pattern.
Repeat these 2 rows until it measures the length of the foot
but don’t bind off. Cut the yarn leaving
a 14-inch tail. Using a tapestry needle,
run the yarn through the live stitches and pull the yarn through all the
stitches and pull tight. Work in the
yarn.
So I discovered that the section between the K9 of the original
2nd row was the bottom of the foot.
That’s where I needed to include the thrums. I guess you could add them to the entire
inside but the wool locks I was going to use for the thrums are quite long
stapled and would wrap up around the sides.
On the first slipper I made, I interspersed the thrums 3
across the 9 stitch area and then staggered 2 across 4 rows later. But I thought it needed a little more
fullness so on the second one, I put 3 thrums across on each row.
I also changed the way I closed up the back seam. The instructions say to sew the edges and
then draw the 9 stitches of the bottom together. On the second pair, I picked up 9 stitches
along the back and knit a triangle inset to make the heel a little squarer. Gathering the stitches made a bump in the
back that wasn’t very comfortable.
I finished them and really liked where they were headed but,
since today is the perfect day to try out warmy, cozy slippers, I realized they
needed a little more on the bottom.
So I pulled out the chunky handspun from my leftovers and
knitted an attachable sole. To add to
the cush and the warmth, I decided I would also pack the pocket between the new
sole and the bottom of the slipper with wool roving. Ain’t no cold getting’ near my tootsies with
these suckers!
Tuesday, February 18, 2014
Hat in a Weekend
I’ve been spinning again lately and am loving it. I’ve been able to finish several projects but
the most fun was the one I just finished.
On Saturday I was going out and about and while I was
getting ready, I realized that I don’t have a black knit hat. A black knit hat is much like having a little
black dress. Everyone needs one and they
work for every occasion.
So I had a couple of choices. I would love to have one made of alpaca just because
it’s soooooo soft and cozy. I could go
to the yarn store and take the chance that they might have some black alpaca
but we all know what happens when you go shopping knowing exactly what you’re
looking for. The other choice was to
dive into the stash and spin the yarn for the hat.
I knew that I had black merino fiber but wasn’t sure if I
had any alpaca. As I was searching, I
came across a very dark alpaca that was labeled black so I pulled that out
along with the black merino and went to the Kromski Minstrel. For a while I thought the alpaca would work
but I decided it wasn’t black enough. It
was really a deep, deep brown, not at all what I was looking for. But before I figured that out, I’d got a full
bobbin spun (about half of the fiber in the bag).
It was the turn of the merino. It was dyed black and just the ticket, so I
got to work. I spun and spun and watched
a marathon of Property Brothers and got my full bobbin of black singles. That was Saturday. On Sunday came the plying. I wanted the plying to go quickly so I Navajo
plied it into a 3-ply yarn – winding up with about 160 yards (more or
less). Into the bath it went and then
hung to dry.
I knew it would bloom a little (being Merino) but didn’t
know it would bloom quite as much as it did.
On Monday morning I ended up with a beautiful 3-ply worsted weight yarn,
ready to start the knitting.
On Monday evening, I started out with an i-cord and went from there. Here’s how it ended up.
If you’d like to make your very own little black hat, here’s
the pattern. It hasn’t been “tested,” it’s
just what I did for mine.
Black Beret
160 yds worsted weight yarn (that’s how much I had and I
ended up with a couple of yards left over)
US size 6 & size 7 double pointed needles (or circs or
however you like to knit in the round)
(I started with the US size 6 needle and changed to the size
7 needle after I’d finished the increases.
There was no grand plan, it was just what I did. There was a reason
but it’s too long a story to go into. You
can work your hat on either size needle, depending on how large or small you want
the hat.)
Cast on 4 stitches and work an i-cord for about 2 inches.
Move the stitches to 4 needles by knitting into the front
and back of each stitch with a different needle.
Knit 1 round.
Yarn over (YO), knit 1 – repeat around.
Knit 1 round.
YO, knit 2 – repeat around
Knit 1 round.
YO, knit 3 – repeat around
Knit 1 round.
Keep increasing in this manner until you have 14 stitches in
each of the 8 sections (2 sections on each needle)
Knit 2 rounds.
(Start decreases.)
Knit 5, knit 2 together (k2tog) – repeat around
Knit 1 round
Knit 4, k2tog – repeat around
Knit 1 round
Start band.
Knit 2, purl 2 – repeat around
Work K2P2 ribbing for 15 rounds.
Bind off with a stretchy bind off.
Bob is now your uncle.
Thursday, February 13, 2014
In the Land O'Cotton
My friend Laurie has been learning to spin cotton. She’s been texting me photos and descriptions
of her progress. I’ve got more than a
few projects going on, including a final curtain valance for the living room
windows. (It’s going to be a thistle
pattern, a nod to my love for Scotland.)
I mentioned this was an ongoing project. This is a skein I spun earlier. I have another 2-3 larger skeins floating around here somewhere, one spun from tri-color natural-colored cotton. The goal was to spin enough to knit something but I haven’t figured out yet what would be best to knit.
Just the mention of cotton, however, sucked me back into the land of
cotton. I just couldn’t stay away so I
dug out my ongoing cotton spinning project (ongoing because cotton lasts
FOREVER) and went to work.
The small ball is a singles of about 300 yards of cotton, I
would estimate. The ball being wound
from the 2 spindles is probably another 150 yards at least – as a 2-ply, of
course. I can’t wait to wind this cotton
off so I can spin another singles to match the ball and get it all plied. Will that be enough cotton spun?
I mentioned this was an ongoing project. This is a skein I spun earlier. I have another 2-3 larger skeins floating around here somewhere, one spun from tri-color natural-colored cotton. The goal was to spin enough to knit something but I haven’t figured out yet what would be best to knit.
Saturday, February 8, 2014
Wired
Sometimes being cheap (and restless) is the mother of
invention. The other day I was in a
store and found a really cool wire basket.
I liked it so much, in fact that I was going to buy it. But when I got to the front of the store,
there was a really long line and I got bored so I left without buying it. But I kept thinking about.
Fast forward a couple of days when I was in JoAnn’s looking
for long pins in the floral section when I spied with my little eye some flat
floral wire. Flat wire. I’ve done a fair bit of beading and jewelry
making but I’d never seen this wire. Granted it was in the floral section where I
never go but still, you’d think I would have seen it somewhere but I hadn’t. But there it was. Waaahaaahaaa.
The store boughten basket was made with the round wire and a
lot of the light gauge wire to hold the pieces together but now with the flat
wire, all I would need is to fold the wire over the top and bottom circles and
voilá.
So that’s what I did.
I also found that with the flat wire, I could use that fold-over to hold
the fabric liner. I don’t know yet how
secure that’s going to be but it works.
If it doesn’t hold, I’ve got an idea on how I could attach it with some
26 gauge wire. But I want to try this
first.
Saturday, February 1, 2014
Can't Stop
I just can’t stop starting new lace projects. Two of them have been on the list for a long
time and one just popped out a couple of nights ago.
There’s the tree that never grew,
All of these are based in legends that you can read about
here. I took my representation from a photo of light post found in
the city.
A little over a year ago I got hold of a Spanish lace
magazine called, La Encajera. In it was a pattern
for a bobbin lace fan. It was really
beautiful but it was also composed of elements that I knew how to do –
individually, at least. The challenge
with it was that there were absolutely no instructions. There was the pricking and a good photo but
no clues as to how many pairs of bobbins, not to mention how to hang them,
start off or anything else. For a long
time, I knew it was beyond my skills so I prepared the pricking, ordered the
thread and waited for the right time.
It seems to be the right time now so I shrunk the pricking
to match the thread I wanted to use (a nice linen thread) and got everything
started. If I just work slowly and pay
close attention to how each element interacts with its neighbor, I should be
okay. I’ve only had to take out part of
it twice so I think this is pretty good progress.
The second project was one I thought about last summer as I
was in the process of buying the house.
I wanted something of my Glasgow heritage to be represented in the house
but wasn’t sure how I wanted to do it. After
I did the Victorian Lady piece for Jane, I realized that this was the perfect
style to work a piece based on the symbols and emblems that make up the coat of
arms of Glasgow.
All based on:
There’s the bird that never flew,
There’s the fish that never swam,
There’s the bell that never rang.
I’ve started but am prepared to go through a bit of trial
and error to make sure to get something that will take pride of place over the
mantle.
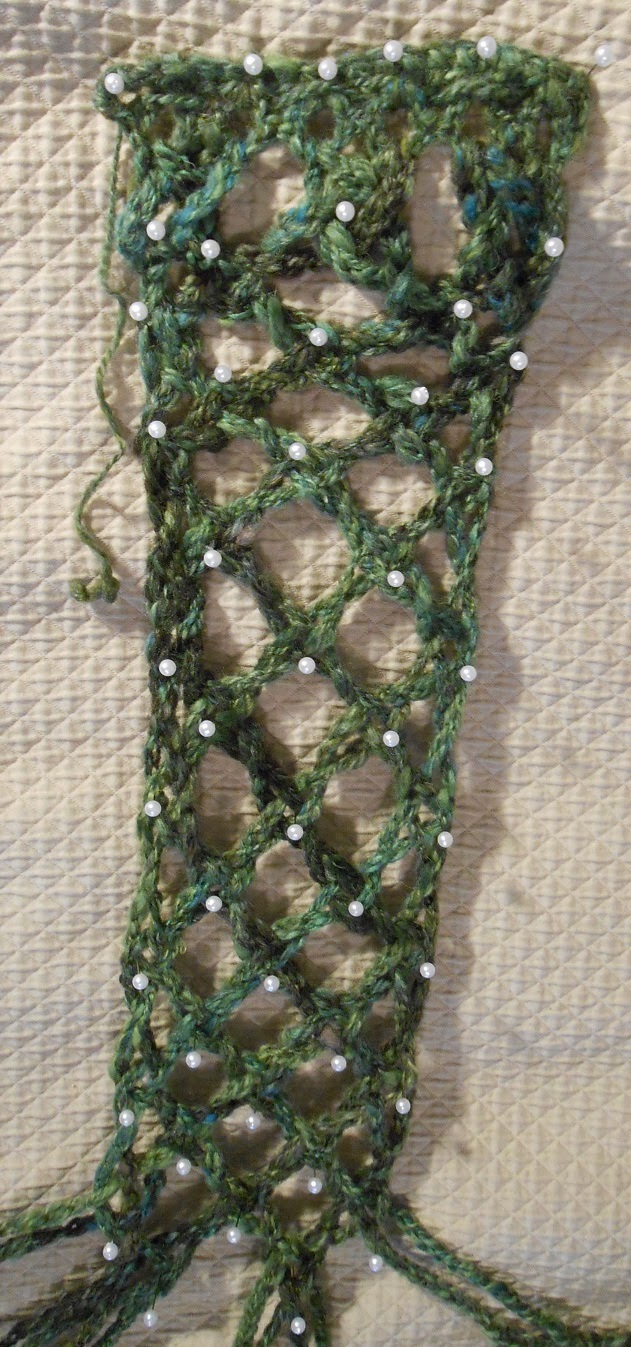
Finally, I had a crazy idea a couple of nights ago. I had brought up a handspun skein of yarn
from the basement that I was trying to decide what it wanted to be. I had a lot of fun spinning it but I only had
1 skein of chunky yarn that wasn’t super soft and I wasn’t sure what to do with
it. I’d brought it up and dug out some
needles, assuming I would be knitting something.
Who knows how these things happen but I looked at it and
thought, “I wonder if I could use this to lace a scarf?” Sure I could but how would I do it. Although it was pretty chunky, I felt it
needed a little more bulk so I decided to crochet a looooooong chain and use
that for the lacing. So I made a base
and then crocheted 6 pairs of chains. At
first I thought I would need more but after thinking about it a little, I
decided that any more would make it too bulky so I left it at that.
A couple of unknowns were:
-
How long should I make each chain? I just made them long and tried to make them roughly the same length. When I finished the chain, I only loosely bound it off – I figured I would need to adjust the length at the end of the day. Actually, I was pretty sure I would need to add to the length (I didn’t) but this would work either way – to lengthen or shorten.
- Where would I do the lacing? I wasn’t going to make an actual pricking so I thought the bed would be plenty long for working it. It was enough but not plenty. When I reached the end of the bed, I
finished. Plus I had only 1 of my large
pins left. It was long enough.
-
How would I finish it off at the end? I ended up making a similar placket to what I’d
begun with and tied the chains onto it.
The yarn ends were worked in with a needle but it needed more. I decided to go with a plaited fringe. I think it needs some large beads added to
the fringe area but I didn’t have what I wanted on hand and it’s a freezing
sheet of ice on the roads outside. Beads
can always be added later.
It was a fun project and gave me tons of ideas for some
funky projects I could work in a similar manner.
Labels:
bobbin lace,
bobbin lace fan,
Glasgow,
handspun,
scarf
Subscribe to:
Posts (Atom)