Tuesday, February 18, 2014

Hat in a Weekend


I’ve been spinning again lately and am loving it.  I’ve been able to finish several projects but the most fun was the one I just finished.

On Saturday I was going out and about and while I was getting ready, I realized that I don’t have a black knit hat.  A black knit hat is much like having a little black dress.  Everyone needs one and they work for every occasion. 

So I had a couple of choices.  I would love to have one made of alpaca just because it’s soooooo soft and cozy.  I could go to the yarn store and take the chance that they might have some black alpaca but we all know what happens when you go shopping knowing exactly what you’re looking for.  The other choice was to dive into the stash and spin the yarn for the hat.

I knew that I had black merino fiber but wasn’t sure if I had any alpaca.  As I was searching, I came across a very dark alpaca that was labeled black so I pulled that out along with the black merino and went to the Kromski Minstrel.  For a while I thought the alpaca would work but I decided it wasn’t black enough.  It was really a deep, deep brown, not at all what I was looking for.  But before I figured that out, I’d got a full bobbin spun (about half of the fiber in the bag). 

It was the turn of the merino.  It was dyed black and just the ticket, so I got to work.  I spun and spun and watched a marathon of Property Brothers and got my full bobbin of black singles.  That was Saturday.  On Sunday came the plying.  I wanted the plying to go quickly so I Navajo plied it into a 3-ply yarn – winding up with about 160 yards (more or less).  Into the bath it went and then hung to dry. 

I knew it would bloom a little (being Merino) but didn’t know it would bloom quite as much as it did.  On Monday morning I ended up with a beautiful 3-ply worsted weight yarn, ready to start the knitting.

On Monday evening, I started out with an i-cord and went from there.  Here’s how it ended up.

If you’d like to make your very own little black hat, here’s the pattern.  It hasn’t been “tested,” it’s just what I did for mine.

Black Beret

160 yds worsted weight yarn (that’s how much I had and I ended up with a couple of yards left over)

US size 6 & size 7 double pointed needles (or circs or however you like to knit in the round)

(I started with the US size 6 needle and changed to the size 7 needle after I’d finished the increases.  There was no grand plan, it was just what I did. There was a reason but it’s too long a story to go into.  You can work your hat on either size needle, depending on how large or small you want the hat.)

Cast on 4 stitches and work an i-cord for about 2 inches.

Move the stitches to 4 needles by knitting into the front and back of each stitch with a different needle.

Knit 1 round.

Yarn over (YO), knit 1 – repeat around.

Knit 1 round.

YO, knit 2 – repeat around

Knit 1 round.

YO, knit 3 – repeat around

Knit 1 round.

Keep increasing in this manner until you have 14 stitches in each of the 8 sections (2 sections on each needle)

Knit 2 rounds.

(Start decreases.)

Knit 5, knit 2 together (k2tog) – repeat around

Knit 1 round

Knit 4, k2tog – repeat around

Knit 1 round

Start band.

Knit 2, purl 2 – repeat around

Work K2P2 ribbing for 15 rounds.

Bind off with a stretchy bind off.

Bob is now your uncle.

Thursday, February 13, 2014

In the Land O'Cotton

My friend Laurie has been learning to spin cotton.  She’s been texting me photos and descriptions of her progress.  I’ve got more than a few projects going on, including a final curtain valance for the living room windows.  (It’s going to be a thistle pattern, a nod to my love for Scotland.)

Just the mention of cotton, however, sucked me back into the land of cotton.  I just couldn’t stay away so I dug out my ongoing cotton spinning project (ongoing because cotton lasts FOREVER) and went to work. 


The small ball is a singles of about 300 yards of cotton, I would estimate.  The ball being wound from the 2 spindles is probably another 150 yards at least – as a 2-ply, of course.  I can’t wait to wind this cotton off so I can spin another singles to match the ball and get it all plied.  Will that be enough cotton spun?

I mentioned this was an ongoing project.  This is a skein I spun earlier.  I have another 2-3 larger skeins floating around here somewhere, one spun from tri-color natural-colored cotton.  The goal was to spin enough to knit something but I haven’t figured out yet what would be best to knit.

Saturday, February 8, 2014

Wired


Sometimes being cheap (and restless) is the mother of invention.  The other day I was in a store and found a really cool wire basket.  I liked it so much, in fact that I was going to buy it.  But when I got to the front of the store, there was a really long line and I got bored so I left without buying it.  But I kept thinking about.

Fast forward a couple of days when I was in JoAnn’s looking for long pins in the floral section when I spied with my little eye some flat floral wire.  Flat wire.  I’ve done a fair bit of beading and jewelry making but I’d never seen this wire.  Granted it was in the floral section where I never go but still, you’d think I would have seen it somewhere but I hadn’t.  But there it was.  Waaahaaahaaa.

The store boughten basket was made with the round wire and a lot of the light gauge wire to hold the pieces together but now with the flat wire, all I would need is to fold the wire over the top and bottom circles and voilá.

So that’s what I did.  I also found that with the flat wire, I could use that fold-over to hold the fabric liner.  I don’t know yet how secure that’s going to be but it works.  If it doesn’t hold, I’ve got an idea on how I could attach it with some 26 gauge wire.  But I want to try this first.

 How many things could be done to customize this pattern?  Myriad

(Edited to show the basket in use and in place.)


Saturday, February 1, 2014

Can't Stop

 I just can’t stop starting new lace projects.  Two of them have been on the list for a long time and one just popped out a couple of nights ago.

A little over a year ago I got hold of a Spanish lace magazine called, La Encajera.  In it was a pattern for a bobbin lace fan.  It was really beautiful but it was also composed of elements that I knew how to do – individually, at least.  The challenge with it was that there were absolutely no instructions.  There was the pricking and a good photo but no clues as to how many pairs of bobbins, not to mention how to hang them, start off or anything else.  For a long time, I knew it was beyond my skills so I prepared the pricking, ordered the thread and waited for the right time.

It seems to be the right time now so I shrunk the pricking to match the thread I wanted to use (a nice linen thread) and got everything started.  If I just work slowly and pay close attention to how each element interacts with its neighbor, I should be okay.  I’ve only had to take out part of it twice so I think this is pretty good progress.

The second project was one I thought about last summer as I was in the process of buying the house.  I wanted something of my Glasgow heritage to be represented in the house but wasn’t sure how I wanted to do it.  After I did the Victorian Lady piece for Jane, I realized that this was the perfect style to work a piece based on the symbols and emblems that make up the coat of arms of Glasgow. 
 
All based on:

 There’s the tree that never grew,

There’s the bird that never flew,

There’s the fish that never swam,

There’s the bell that never rang.

 All of these are based in legends that you can read about hereI took my representation from a photo of light post found in the city.

I’ve started but am prepared to go through a bit of trial and error to make sure to get something that will take pride of place over the mantle.

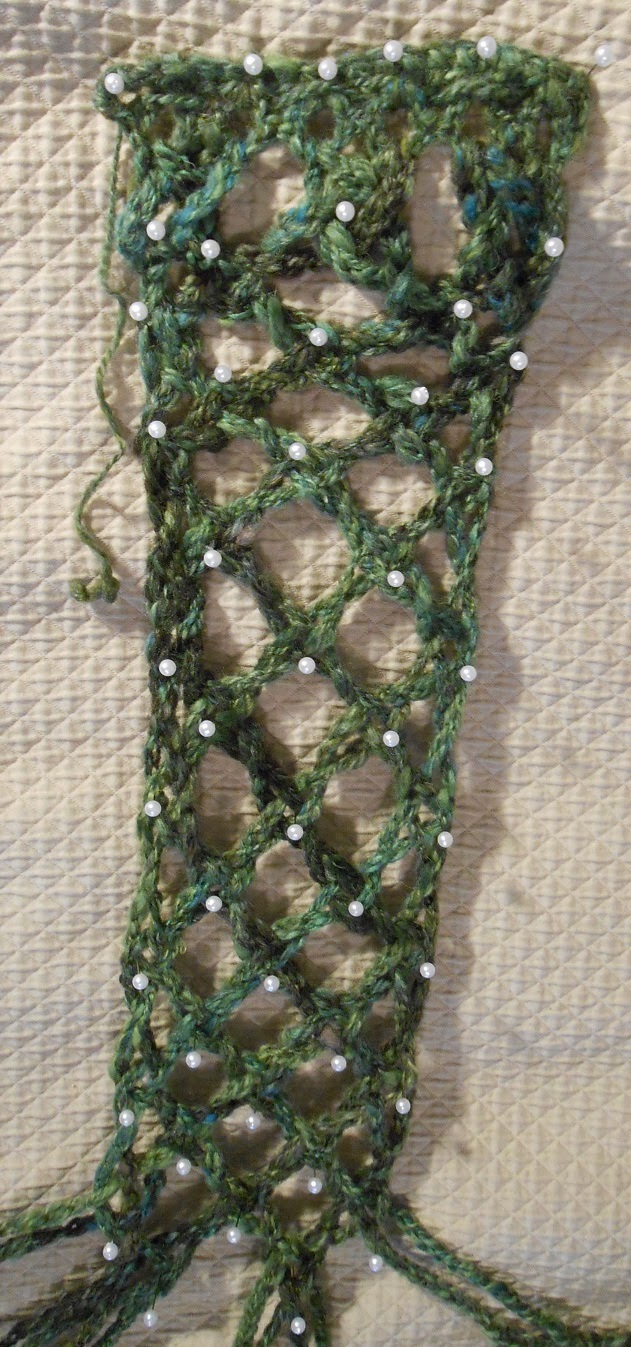
Finally, I had a crazy idea a couple of nights ago.  I had brought up a handspun skein of yarn from the basement that I was trying to decide what it wanted to be.  I had a lot of fun spinning it but I only had 1 skein of chunky yarn that wasn’t super soft and I wasn’t sure what to do with it.  I’d brought it up and dug out some needles, assuming I would be knitting something.

Who knows how these things happen but I looked at it and thought, “I wonder if I could use this to lace a scarf?”  Sure I could but how would I do it.  Although it was pretty chunky, I felt it needed a little more bulk so I decided to crochet a looooooong chain and use that for the lacing.  So I made a base and then crocheted 6 pairs of chains.  At first I thought I would need more but after thinking about it a little, I decided that any more would make it too bulky so I left it at that. 


A couple of unknowns were:
  • How long should I make each chain?  I just made them long and tried to make them roughly the same length.  When I finished the chain, I only loosely bound it off – I figured I would need to adjust the length at the end of the day.  Actually, I was pretty sure I would need to add to the length (I didn’t) but this would work either way – to lengthen or shorten.
  •  Where would I do the lacing?  I wasn’t going to make an actual pricking so I thought the bed would be plenty long for working it.  It was enough but not plenty.  When I reached the end of the bed, I finished.  Plus I had only 1 of my large pins left.  It was long enough.
  • How would I finish it off at the end?  I ended up making a similar placket to what I’d begun with and tied the chains onto it.  The yarn ends were worked in with a needle but it needed more.  I decided to go with a plaited fringe.  I think it needs some large beads added to the fringe area but I didn’t have what I wanted on hand and it’s a freezing sheet of ice on the roads outside.  Beads can always be added later.
 
It was a fun project and gave me tons of ideas for some funky projects I could work in a similar manner. 

Sunday, January 26, 2014

Flax to Linen


I’ve just finished spinning a bunch of flax for a friend of mine.  The flax had belonged to a dear friend of hers who passed away.  She didn’t want a very fine thread because she wanted to use it in her knitting but the fiber was fairly coarse anyway so it was spun “rustically.”  That’s my way of saying that I didn’t know what the heck I was doing but had a great reference book to guide me and I learned a few things.  Linen Hand Spinning and Weaving by Patricia Baines was my introduction to this challenging fiber.
Here are a few of things I learning in this process, which, by the way, took me about 2 years to do – 1 ½ years sitting staring at me from its perch on one of my stash piles and 6 months of starting in the summer when it could be done on the back porch and then putting it off for another 5 ½ months because it took a lot of concentration).  All in all, it was probably about 6 hours of spinning. 

  1. Learning to dress the distaff correctly is critical.  If it the distaff isn’t correctly dressed, it can either be too dense to draft well or too loose, making it hard to draw in the right amount of fiber.  Learned by experience as well as by reference to the book.
  2. Flax shouldn’t be spun in the living room unless you have a couple of hours to dust, mop and vacuum after you’re done.  If you’re spinning on carpet, by all means, lay a sheet or cloth beneath your entire work area.  Flax is messy.  It’s like hanging out with a bunch of grass clippings, which it sorta is, if you think about it.  If you have people in your house with allergies, I strongly recommend spinning this fiber outside.
  3. When spinning flax, be prepared to pamper your wheel.   Make sure that it’s well-oiled throughout the process and that you clean it thoroughly after you’re finished.  You’ll most likely be spinning on a very high ratio which means your wheel needs lots of oil to handle the very fast moving parts.  Reasons for the cleaning, refer to #2.
  4. Patricia Baines says that the tradition (and the innate desire of the flax fibers) is to spin S singles and Z ply although she does stress that if you’re going to weave with your thread, there’s not a need to ply it.
  5. You should keep a pot of warm water or a sponge wetted with warm water by your side because water makes flax stronger and makes it possible to spin a smoother yarn or thread.
  6. It makes your hands smell very fresh.
  7. It’s very difficult to find well prepared flax although I did located some through The Woolery in Kentucky.  But it was backordered for about 6 months before I received it.
  8. Ms. Baines recommendation to treadle very slowly is very good advice.
I have an ambition to spin some flax finely and evenly enough to use it for a piece of bobbin lace, which is the traditional fiber used for the craft.  Check back in another 2 years and I might be close to giving it a go! 

Wednesday, January 22, 2014

Frog in Snow

I had to laugh this morning when I looked out the bedroom window into the back yard and saw this.
This little guy is sitting on a bird bath that used to sit in my garden.  It got knocked down during one of the storms but he's patiently waiting for spring.

Monday, January 20, 2014

Fini

I love it when projects go like this one did. 
 
Way back last year, early last year, I bought some fiber.  It was a special deal from Ashland Bay that had a variety of unusual wool fibers, including "Portuguese" wool and Masham (a breed of sheep).  I had some dark chocolate Shetland (another breed of sheep) in my stash already so that gave me a natural white (Portuguese), medium grayish brown (Masham), and dark brown (Shetland).  Several years ago I'd used the Ashland Bay Apple Green to spin some yarn for mittens and a scarf and I loved the color.  I thought that would be a great pop of color to go with the natural colors so I got some of that as well.  Late last year on my trip to Maine, I got to go to Halcyon Yarns (one of my absolute favorite places in the universe) and while I was there I found a Merino (yet another sheep breed) mix of 3 shades of natural colors that you spin together and get a medium brown with good depth to it.
 I started spinning a nice fluffy 2-ply yarn that after washing ended up much thicker than I expected.  But I had a picture in my mind of what a Fair Isle sweater would look like using these yarns.  Just a picture.  But I realized that the yarn was really too chunky for a sweater and I spent much of my drive to my Mom's mulling over what to do.  Lo and behold, I came across a knitting book in an antique mall that showed a cabled poncho using thick yarn and it hit me.  That would be a perfect use for my lovely yarn.
 I chose my needles and number of stitches to cast on (based on the cabled poncho pattern) and started out.  Actually first of all, knit a swatch using all the colors and decided that was how I wanted to start off.  And then I carried on.  I decided that, because of the chunky yarn, I should use smaller motif designs.  With my handy pattern dictionary at my side, I looked through, found a few that I liked, decided the order of them and I knit.  Once I got to the next section and it seemed like it was time for another one, I chose and knit another one and so on.
Once I got to the shoulders, I wasn't really sure how to do the decreases so I just winged it and it came out perfectly.  So how does one finish it off?  With a wide fold-over pivot edged collar.  The collar done like that made room for the button bands and finished it off just right (as did the heavy shell vintage buttons that I already had on hand - just right).