And second sleeve done.
Saturday, March 17, 2012


Friday, March 16, 2012
One Down
In case you're counting, it's one sleeve, ribbing and all, down and the ribbing started on sleeve #2.
Thursday, March 15, 2012
Did you ever notice
Did you ever notice how the smallest baby has the loudest and most penetrating cry, how the most expensive meal contains the smallest amount of actual food and how the sleeve, the smallest diametered component of a sweater takes up the most yarn?
It's the mysteries of life that keep us moving on. That principle has been brought home to me in the bohus sweater.
 It's a funny shape because it's on the dress form that's too big now but this is what I've got. Before this latest effort, it was the body and the one sleeve worked to the point of needing the ribbing and the second sleeve worked just a few inches. Then I ran out of yarn. But I've got plenty of this red merino fiber because I wanted to prepare for just such a situation. This past weekend, I spun another couple of hundred yards of yarn and assumed that would be PLENTY for the body ribbing and to finish the second sleeve and do the ribbing for both sleeves. Sleeves are small around and you decrease all the time as you're knitting. It's simple math, right?
I'm coming to believe it's actually quantum physics, it's Time Lord physics (bigger on the inside), there nothing simple about it in the least. It's the same force that comes to bear on a project when you're trying to get the same number of rows in a second object as the first, whether that be a sleeve or a sock. There's a shift in time that happens that means you're always working much, much longer on the second object and you have to press through that place that feels like treading through thick gooey stuff until you break through and find you've knitting 10 rows too many and have to rip out.
All of that to say that I've been within 12 rounds of the second sleeve matching the first for about a month this week and it never reaches the end. It should be there. I'm a fast knitter and I've actually spent time knitting this week instead of working on my fascinating bobbin lace. I've also blown off 2 meetings this week that I should have attended and spent that time knitting. There's no reason why a little bitty old sleeve shouldn't be finished. But it's not.
And not only is the sleeve not finished, it has sucked in a gob of yarn. This last skein should have been more than sufficient to finish and now I'm worried. It looks more than half gone (although looks can be deceptive in the time warp) and it's going to take me another year to finish the sleeve before I can even start on the ribbing.
On top of all that, I tried it on tonight (the advantage of a top down) and I'm not at all sure that the body is long enough. I know in my mind that when it's washed and properly blocked, it won't be all bunched up like this. It will relax. That's what I keep telling myself. It will relax. But I'm not sure. I did try it on and measure it before I entered the time warp and it seemed right to me so I'm just going to trust that this is the timey, wimey thing affecting my judgement.
I expect I'm going to be back at the spinning wheel this weekend, though, just to make the loop complete.
It's the mysteries of life that keep us moving on. That principle has been brought home to me in the bohus sweater.

I'm coming to believe it's actually quantum physics, it's Time Lord physics (bigger on the inside), there nothing simple about it in the least. It's the same force that comes to bear on a project when you're trying to get the same number of rows in a second object as the first, whether that be a sleeve or a sock. There's a shift in time that happens that means you're always working much, much longer on the second object and you have to press through that place that feels like treading through thick gooey stuff until you break through and find you've knitting 10 rows too many and have to rip out.
All of that to say that I've been within 12 rounds of the second sleeve matching the first for about a month this week and it never reaches the end. It should be there. I'm a fast knitter and I've actually spent time knitting this week instead of working on my fascinating bobbin lace. I've also blown off 2 meetings this week that I should have attended and spent that time knitting. There's no reason why a little bitty old sleeve shouldn't be finished. But it's not.
And not only is the sleeve not finished, it has sucked in a gob of yarn. This last skein should have been more than sufficient to finish and now I'm worried. It looks more than half gone (although looks can be deceptive in the time warp) and it's going to take me another year to finish the sleeve before I can even start on the ribbing.
On top of all that, I tried it on tonight (the advantage of a top down) and I'm not at all sure that the body is long enough. I know in my mind that when it's washed and properly blocked, it won't be all bunched up like this. It will relax. That's what I keep telling myself. It will relax. But I'm not sure. I did try it on and measure it before I entered the time warp and it seemed right to me so I'm just going to trust that this is the timey, wimey thing affecting my judgement.
I expect I'm going to be back at the spinning wheel this weekend, though, just to make the loop complete.
Saturday, March 10, 2012
Back in time
I bought something this week. I love Ravelry but I have very little time to spend there. So imagine my surprise when I poked into the bobbin lace group and saw a posting for a roller pillow for sale. I'm feeling good about the bobbin lace thing so I thought it needed to come home with me. It came on Thursday and Thursday night I got a new project started on it.
 This is a pattern containing leaf talleys and braids with picots. All were new things to me so I wasn't quite sure how it would go but it wasn't nearly as hard as I thought it was going to be. I did have a little trouble with the leaf tally until I watched this video on YouTube. I am working on the same type of bobbins as she is and this style seems to work okay. I'm still trying to get the hang of work them consistently but it's going okay so far.
 I've got the hang of the picot from the instructions in the Doris Southard book that I got this pattern from. This thread (DMC perle cotton #12) is a little thick for the pattern but I think it gives it a nice midieval look.
 I've already got about 7 inches or so. I'm trying to think how best to use it in a project. I've got a beautiful empire dress pattern that I can adapt to a top (since I don't wear many dresses) which has an insert like this around the bodice. I think that would be fun but it will have to be longer than 7 inches!
I have also made some progress on the extra yarn I need to finish my bohus sweater. Hopefully I can get this plied and washed tonight so I can get the sweater finished.


I have also made some progress on the extra yarn I need to finish my bohus sweater. Hopefully I can get this plied and washed tonight so I can get the sweater finished.

Monday, March 5, 2012
Sometimes ideas pay off
I get lots of ideas. Most of the time they don't work out but every once in a while they do. Some of the people in the lace group have little wooden stands for their pillows. Here's a miniture of one of them. And here's another that's not quite so expensive. They can angle the top and use it comfortably while they're working. My problem is that I'm really cheap and the tables are very expensive. So I had an idea.
What if I used an inexpensive tripod and was able to attach crossbars to the top to hold the pillow. Then it could be adjusted for height by the tripod legs and adjusted for top angle by the head at the top of the tripod. It sounded good but then I had to figure out how to make the head frame. I wandered through the building supply store wondering what I could use. I found a strip of wood, 1.5x.5inches that was 36 inches long. At the Ace Hardware store, the manager showed me a piece of hardware that would allow me to attach the camera holder to the head frame and that was the last piece of the puzzle.
Here's how it ended up:
 I drilled peg holes along each arm to make it adjustable to hold different pillows snugly. Here it is with one type of pillow.
 And a cookie pillow.
 Here's a view of the bottom with the piece of hardware that I used to attach the head frame to the camera platform. All I had to do is drill a hole and hammer this in. It has teeth that bed into the wood to hold it in place.
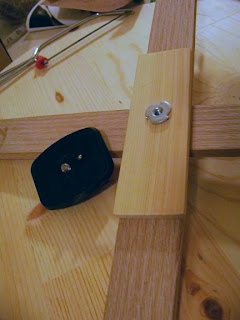 For the pegs, I used a small dowell that I had on hand and cut a few pieces that fit into the drilled holes. The camera platform comes with the tripod. Normally it would screw into a hole on the bottom of the camera. Perfect fit.
 It's also really portable because the tripod came with a carrying case and the frame will travel easily with the pillow. All I lack now is to finish the wood and I've got me a stand! And instead of the $105 for the cheaper stand linked above, I spent a total of about $23 and have the joy of having come up with something all by myself (with a little help from the Ace Hardware guy). Plus I can still use tripod for my camera, too!
What if I used an inexpensive tripod and was able to attach crossbars to the top to hold the pillow. Then it could be adjusted for height by the tripod legs and adjusted for top angle by the head at the top of the tripod. It sounded good but then I had to figure out how to make the head frame. I wandered through the building supply store wondering what I could use. I found a strip of wood, 1.5x.5inches that was 36 inches long. At the Ace Hardware store, the manager showed me a piece of hardware that would allow me to attach the camera holder to the head frame and that was the last piece of the puzzle.
Here's how it ended up:


Sunday, March 4, 2012
Lacy Endings
As you may have noticed, I've been in a lacy place lately. I finally got the hankie (doily) done:
 There are definitely some mistakes and I'm not the best with rolled edging for the hankie (doily) but I couldn't be happier with it. I'm going out later to get a window box to mount it in for display.
While I was at it, I had a yardage project that I started early last year that's been sitting patiently across the room. I knew I only had about 8 inches or so to get to the yard mark so I pulled it over and started working on it. I'm working it on my little homemade travel (sort of) roller pillow.

 Here's a close up of the pattern. It's a little hard to see against the patterned fabric but it's called Fir Tree Edging.
 The Lacemakers group in Chicago that has been so wonderfully helpful and welcoming to me started a yardage club and I decided to do this simple pattern since I was such a rank beginner. The only thing is now I can't remember if they said you have to do 1 or 2 yards. I was just going to stop at 1 yard but all my bobbins have plenty of thread and I've got the hang of it now and the beginning is pretty dreadful so I may just keep going for a while.
This project was a big lesson to me. Not so much in how to do bobbin lace but there was something about committing to keeping going, even in the beginning when it was pretty dreadful (by anyone's standards). I was so tempted to stop and throw it away but I kept going and it kind of flipped a switch in my brain about the rhythm of bobbin lace. I experienced the same thing in tatting when the lady in the dvd I was watching started doing it at speed. It was a totally different rhythm than what I was dong and copying her speed helped my technique tremendously.
I believe that everything from language to lace has a rhythm to it and when you can tune into that, it does something to your brain and your learning and it helps you make sense of the new information. I'm not a scientist but I learn a lot of new things all the time and it's something I've observed. It reminds me of when I first moved to Scotland. The area I lived in had a really broad accent and I was a young girl who'd barely been outside of Texas. I would go to the chippie (fish and chip shop) and they would ask me, "Do you want salt and vinegar." Of course, I didn't know at first that's what they were asking, I just nodded my head and observed what happened! They shook some salt and then drowned it in vinegar. (Oooh, that's making me hungry.) But once I got the rhythm of the accent, it helped me hear where the speaker moved from one word to the next and I never had a problem understanding anyone again.

While I was at it, I had a yardage project that I started early last year that's been sitting patiently across the room. I knew I only had about 8 inches or so to get to the yard mark so I pulled it over and started working on it. I'm working it on my little homemade travel (sort of) roller pillow.


This project was a big lesson to me. Not so much in how to do bobbin lace but there was something about committing to keeping going, even in the beginning when it was pretty dreadful (by anyone's standards). I was so tempted to stop and throw it away but I kept going and it kind of flipped a switch in my brain about the rhythm of bobbin lace. I experienced the same thing in tatting when the lady in the dvd I was watching started doing it at speed. It was a totally different rhythm than what I was dong and copying her speed helped my technique tremendously.
I believe that everything from language to lace has a rhythm to it and when you can tune into that, it does something to your brain and your learning and it helps you make sense of the new information. I'm not a scientist but I learn a lot of new things all the time and it's something I've observed. It reminds me of when I first moved to Scotland. The area I lived in had a really broad accent and I was a young girl who'd barely been outside of Texas. I would go to the chippie (fish and chip shop) and they would ask me, "Do you want salt and vinegar." Of course, I didn't know at first that's what they were asking, I just nodded my head and observed what happened! They shook some salt and then drowned it in vinegar. (Oooh, that's making me hungry.) But once I got the rhythm of the accent, it helped me hear where the speaker moved from one word to the next and I never had a problem understanding anyone again.
Thursday, March 1, 2012
Finished!
Even with the couple of mistakes, I can't believe I made this. : )

I need to take it to the fabric store tomorrow to get the material for it. It's so light and delicate-feeling. But it's cotton and it's going to go into a display so I think it will hold up fine.
Hummmm....what next? I think there may be a fan in my future. I've gotten fascinated by lace fans and I've got an idea for a mixed lace fan. Hopefully I can get that started this weekend. It's going to have bobbin, tatting, knitted and crochet lace. More on that later.
Subscribe to:
Posts (Atom)